Layers of ultra crispiness and browned to a golden perfection–spring roll wrappers are one of the most important (and favorite) parts of spring rolls and lumpia. These homemade spring roll wrappers will give you a new type of appreciation for that extra crunchy outer layer of spring rolls.
Spring rolls historically came from ancient China and should not be confused with their American cousin, the egg roll. Egg rolls were created during the 20th century in the US and are typically filled with cabbage and meat and served deep fried with a bubbly, crunchy exterior (see my recipe for Vietnamese egg rolls). To learn more about spring rolls vs. egg rolls, you can read this article.
While spring rolls may have as many as a few dozen variations of fillings and wrappers depending on the region they come from, they have a super thin, smooth, and egg-less wrapper made of wheat flour or rice flour, salt, and water. Vietnamese spring rolls are one example of that.
Why make spring roll wrappers?
Growing up, I was the designated spring roll wrapper peeler. If you’ve ever had a mom make spring rolls at home, you know exactly what this means: sitting on the counter carefully and slowly peeling every single super thin layer of wrapper from the semi-frozen stack of Menlo or Three Ladies brand wrappers.
Egg roll or spring roll wrappers are primarily found in many Asian grocery stores for fairly affordable prices, and sometimes you can find them at American stores. Most spring roll wrappers are made up of three basic ingredients: flour, salt, and water. However, after looking at some of the packaging in store-bought wrappers, I found there were lots of additives like food coloring.
After years of buying them at the store, I wanted to make them at home so I could rest easy with knowing what ingredients I was consuming. This recipe is also useful if you can’t find wrappers in your local grocery store.
Mixing the batter
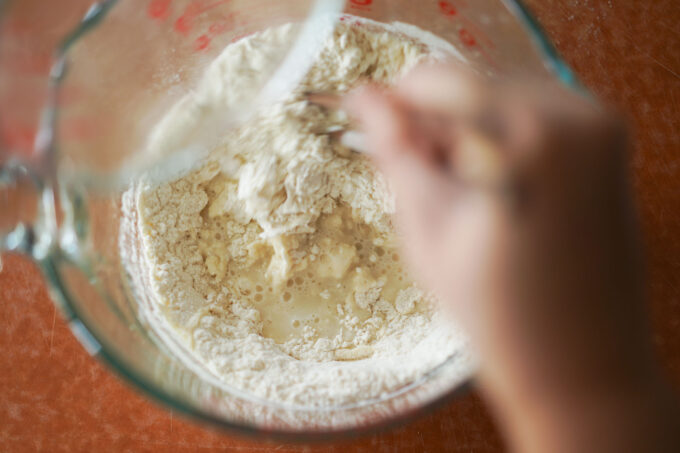
To make the batter, you first want to heat hot water and mix in the salt. Using hot water helps denature the gluten proteins in the dough to produce a smoother texture and more pliable dough to roll out. Start to add in flour and mix thoroughly in a mixing bowl. I like to use chopsticks since the water is hot. You will end up with a slightly sticky ball of dough.
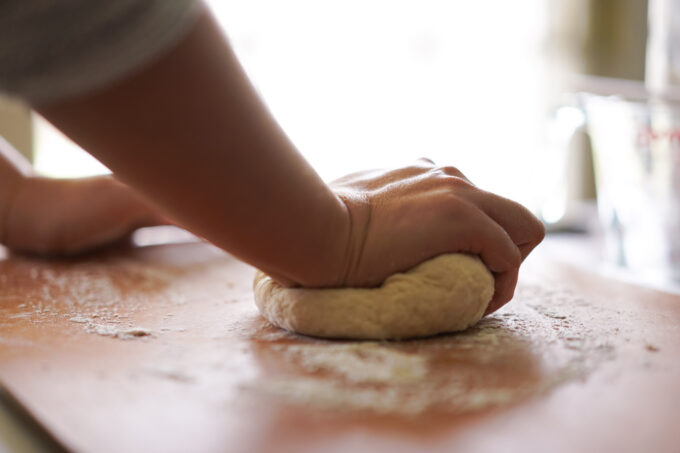
On a floured surface, knead your ball of dough for about five minutes. To knead the dough, press the heel of your hand into the dough in an upwards motion. Slightly turn your dough to the right and fold the dough into itself and repeat heel motion. The end result should be a round ball of dough with a smooth surface.
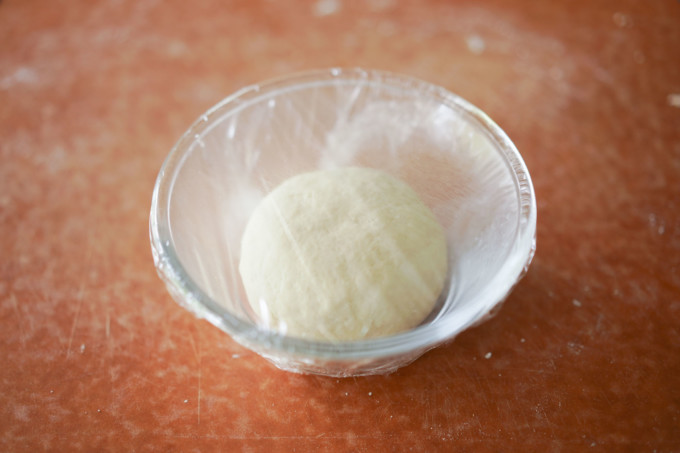
Leave this dough alone until it comes to room temperature and then you need to cover it with cling wrap and let rest for an additional 30 minutes on the counter.
Rolling out dough balls
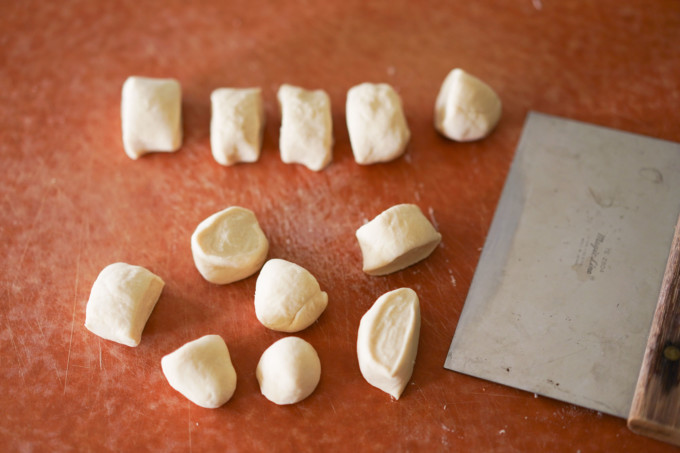
After resting the dough, cut the dough in half and roll out each half to make a long log with a one inch thickness. Cut about 12 small pieces from each log.
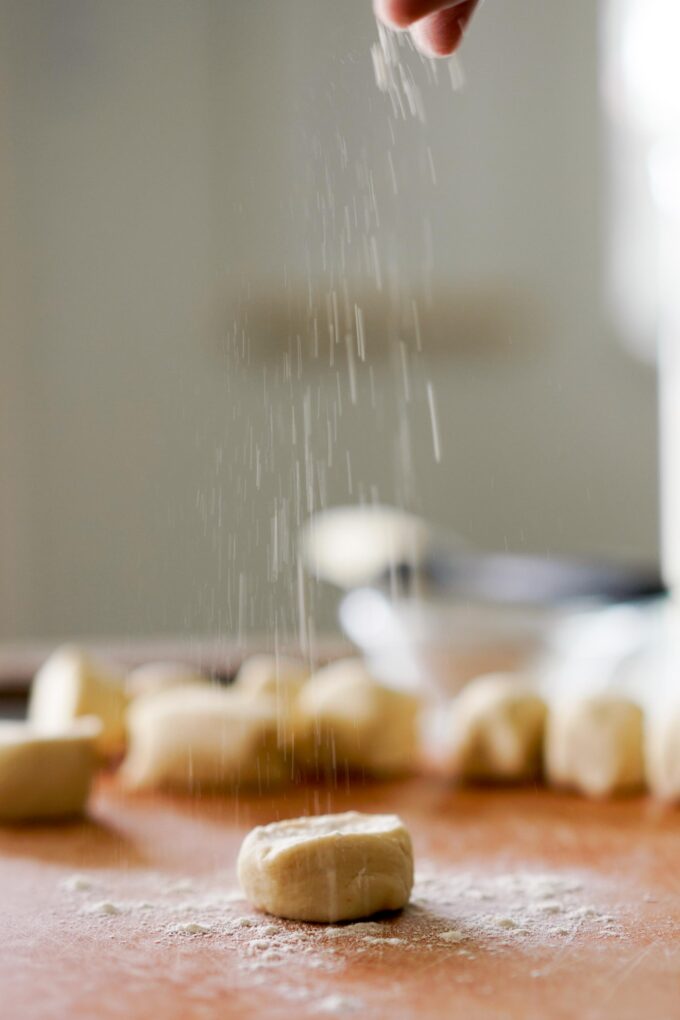
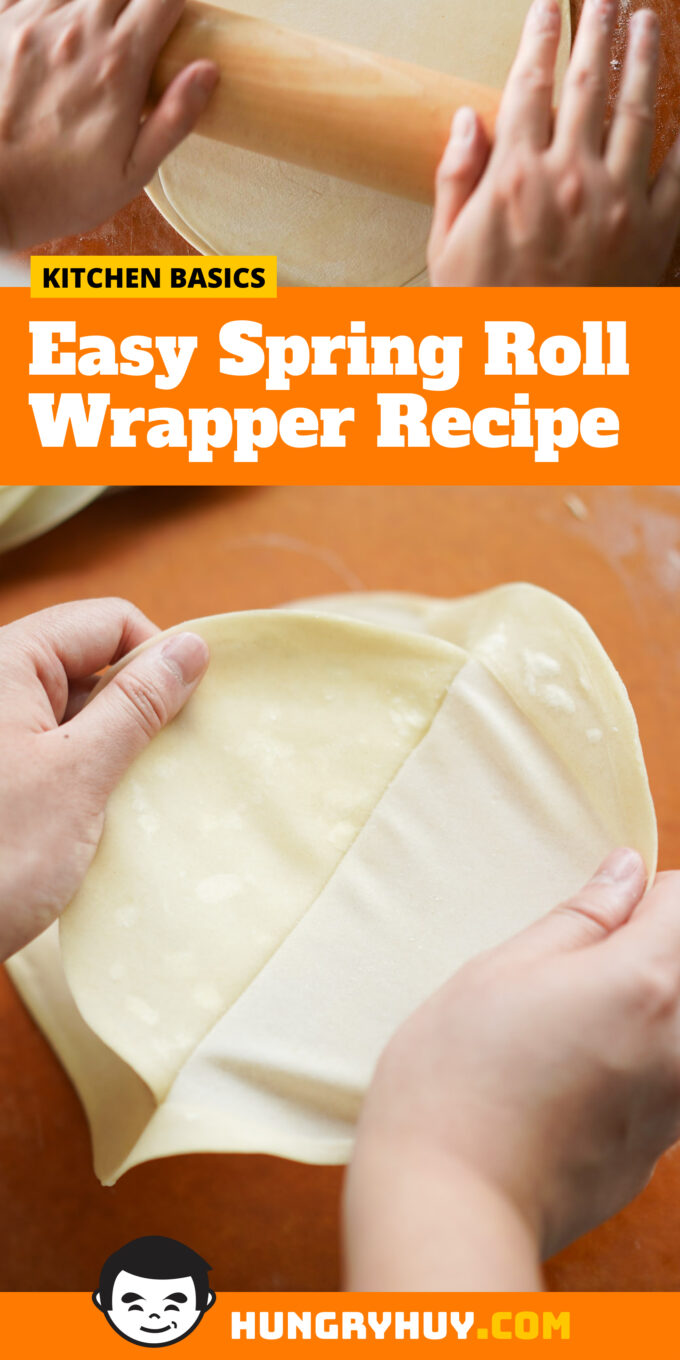
For each ball, sprinkle a little flour on the top and use a rolling pin to roll out the ball into about a four inch circle and 2mm in thickness. Make sure that the circle is the same thickness all around. Repeat this with all the balls.
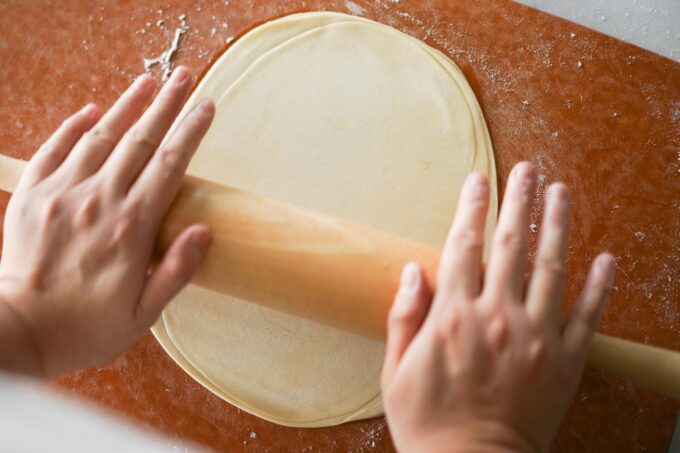
Oil layers, stack and re-roll
Now here comes the wild part of making spring roll wrappers: you stack circles together, re-roll them even thinner, pre-cook them in a pan, and THEN peel them! When I learned about this part, I was mind-blown. This is why you want to make sure all the circles are the same size and shape.
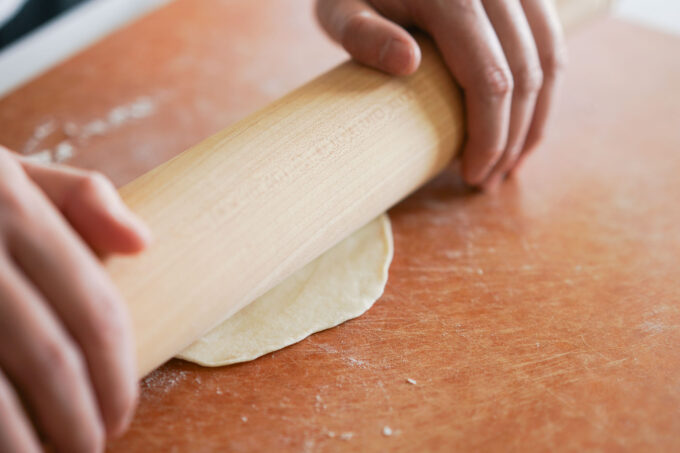
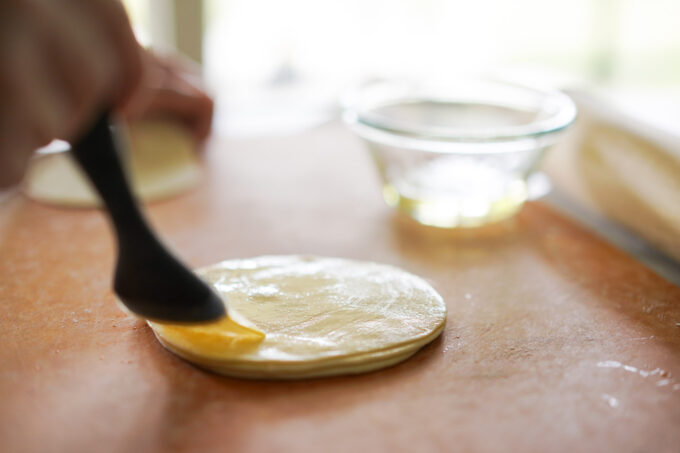
Brush oil on one circle, then top with another circle, and repeat until you have a stack of four circles. I like to stop at four because it’s easier to re-roll. Use your rolling pin and carefully roll out the stack of circles until it becomes about nine to ten inches in diameter. Repeat this with the rest of the small circles.
I tried different versions of making these wrappers: trying to use my pasta machine to refrain from stacking and re-rolling, using cold water to help with the texture of the dough, and even individually pan frying each wrapper. This was all in an effort to make this an easier process. Spoiler, these shortcuts didn’t work. This recipe is not meant for the faint of heart in the kitchen.
Cook in a heated pan
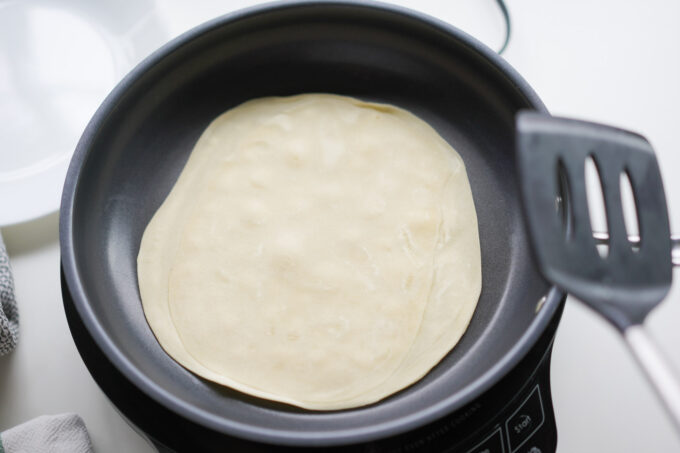
When you’ve finished rolling out the large circle stacks of four wrappers, cook them on a dry (no oil) ten-inch pan over medium heat for about 20 seconds or until you start to see bubbling over the wrappers.
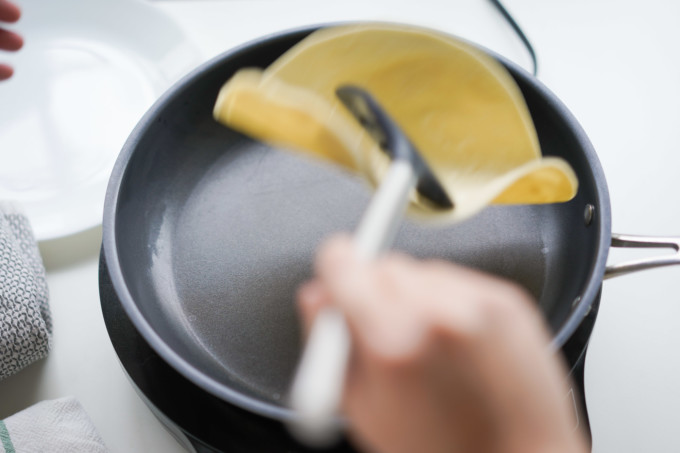
Turn them over and cook for an additional ten seconds. Remove them from the pan and place them on a plate with a cover so they don’t dry out. Continue to cook the rest of your circles.
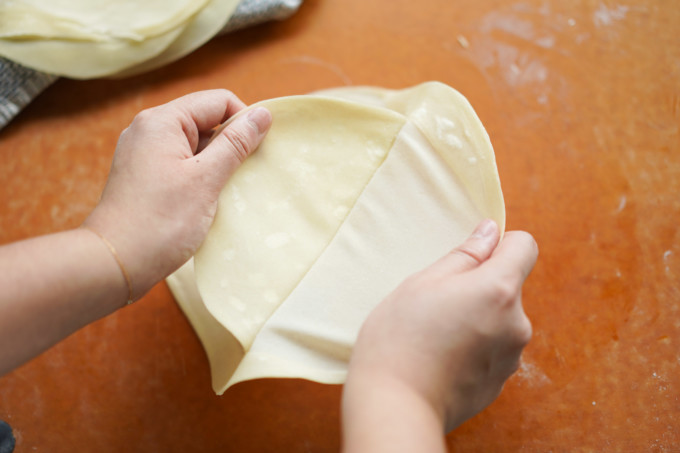
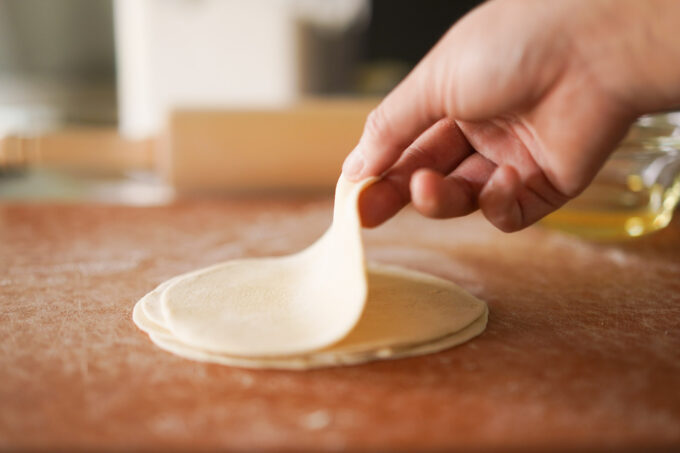
Peel layers

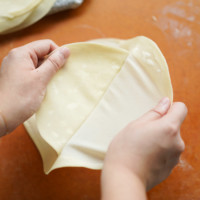
Once your wrappers have cooled to the touch, you can now begin to peel them. Carefully take the top layer and remove it from the stack. I like to move in slow motion and remove the perimeter of the wrapper to make sure I don’t crack or break the wrapper.
Once you’ve peeled the wrappers you can choose to trim down the edges to make it into squares. I like to keep them as is to use as much of the wrapper as possible. If you do want to cut the edges off, you can reuse the end pieces by frying them and making them into wonton chips.
How to cook spring roll wrappers?
Now that you’ve got your handmade spring roll wrappers you can use them for so many different recipes like crispy lumpia, turon (Filipino banana lumpia with caramel sauce), or other types of rolls. If you’re like me and like to eat test wrappers, you can cut them into smaller shapes like triangles or rectangles and fry them in a pot. Think of them like little chips! You can also learn how to wrap spring rolls with my tutorial too.
Storing cooked wrappers
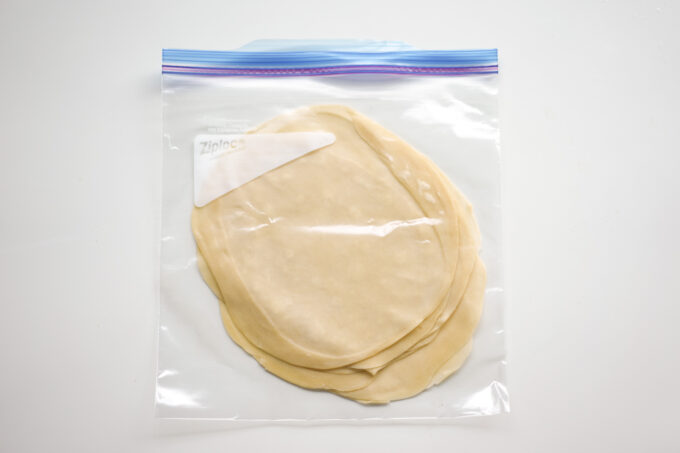
If you don’t need to use the wrappers the same day, you can put them in a ziplock bag and freeze them. These hold up for at least one month. When you want to use them, make sure to defrost them on the counter an hour before you use them.
What is usually in a spring roll?
Spring rolls fillings range in variety depending on where they are made. You can add meat, fresh spring vegetables, or even sweet ingredients like bananas or sugar.
What is the spring roll wrapper made of?
Spring roll wrappers are typically made from flour, salt, and water.
Spring Roll Wrappers
Ingredients
- 240 g (2 c) all purpose flour
- 6 fl oz (¾ c) hot water
- 6 g (2 tsp) salt
- oil
Equipment Used
Instructions
Mixing dough
- Heat hot water and mix in the salt.
- Measure out two cups of flour and slowly add the hot water and salt liquid in a mixing bowl. Use a spoon or chopsticks to mix the flour with the water.
- When the water is incorporated to the flour, you should have a slightly sticky ball of dough. If necessary add additional flour if it’s too wet or water if it's too dry.
- On a floured surface, begin to knead the dough by hand for about five minutes. The end result should be a smooth and round ball of dough. Optionally, you can use a food processor to mix your dough and flour and run the food processor until the ball of dough forms. Knead the dough for three minutes by hand.
- Leave the dough to cool to room temperature and then wrap it with cling wrap to rest for at least 30 minutes on the counter. The dough should be ready once you can press a finger on the dough and it leaves a small imprint.
Rolling out dough
- On a floured surface, roll out the dough into a long log with your hands. Cut the log into 24 pieces. If you have a scale, you can weigh your dough, divide by 24, and weigh each piece to make sure you have uniform pieces when cutting.
- For each individual piece, use a rolling pin to roll out the piece of dough into a circle with a four inch diameter. I like to start from the middle of the circle and roll out to the edge, turn the circle 45 degrees and repeat. This will give you an even circular shape. Roll out all 24 pieces. Make sure to keep all circles the same size and shape.
- Take one circle and paint a layer of oil evenly and top with another circle. Make sure to align the sides. If you have mismatched circles, try to slightly stretch out the circles so they align. Oil the top circle and add another circle. Repeat this process until you have a stack of four circles.
- Using your rolling pin, re-roll the stack of circles into a thin ten inch circle. Make sure to flour your surface if it keeps sticking. Repeat with all your stacks. The thickness of the ten inch circle should be 2 mm.
Cooking wrappers
- On a large pan, cook the thin circle stacks over medium heat for about 20 seconds or until you see the wrapper bubbling. Turn it over and cook for another ten seconds.
- Remove the wrapper from the pan and cover with a dish towel and cook the rest of the wrappers. Leave the wrappers to cool.
- Slowly begin to peel each thin layer of the stack. Take the top layer and carefully pull the edge of the perimeter and release the wrapper.
- Once all the wrappers are peeled, you have the option to trim down the wrappers into a cleaner shape or use them as is.
- Use your wrappers to make spring rolls or freeze them in plastic freezer bags.


I have made this and they were delicious, much better than store bought.
I filled it with a recipe of vegetables sautéed in soy sauce and vinegar. I now don’t find anymore. Could you put on a recipe for vegetable filling?
Thank you!
Better than store bought!
Thanks Aura!