Crispy and fresh donuts with the chewiness of mochi on the inside–no more waiting in line for mochi donuts because making this easy mochi donut recipe at home will give you the freshest treat ever.
I’ll show you how to make mochi donuts from scratch without the tedious task of rolling out balls of dough, all you need is a piping bag and some parchment paper!
Texture & taste of mochi donuts
If you haven’t heard of mochi donuts yet, you must be living under a rock because these are the best of both donut and mochi worlds! These donuts were popularized in Japan from Mister Donut and known as “pon de ring,” whose donuts are famous for their bubble-ring shape. It’s also well-loved for its similar mochi-like texture on the inside and deep-fried donut crust.
I first heard of these delectable treats from our amazing neighbors who dropped off some fresh mochi donuts one weekend morning. I had never had donuts that had an extra chewy center with a crisp outer crust before, but I was hooked. Not long after, I went around the city and tried multiple mochi donuts from Fill Bakeshop, Friendly Donuts, and MoDo Hawaii.
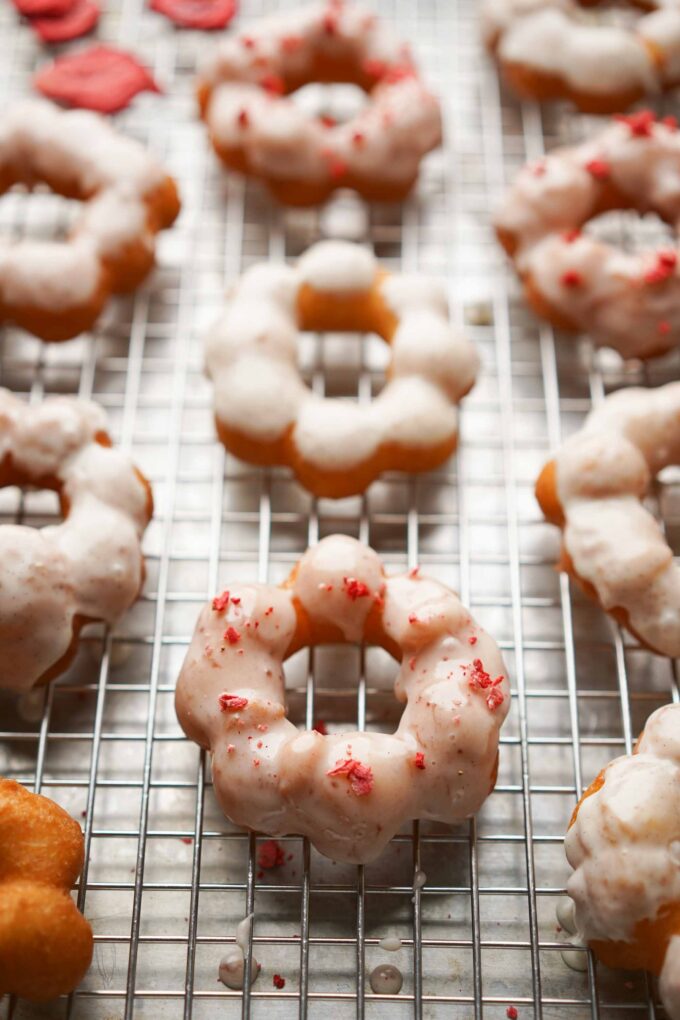
They mostly come in a cute bubble ring shape and are drizzled with some tasty flavors like guava, earl grey, matcha, and black sesame. My favorite is MoDo donuts for their light and airy texture while still maintaining a chewy center.
This recipe is an ode to those lovely mochi donuts and glazes. After searching the internet and testing out this recipe so many times, I’ve finally found the perfect combination of mochi and donut textures and flavors that I love.
What is mochi?
Mochi is a type of rice cake made of short-grain glutinous rice, water, sugar, and cornstarch. After the rice is cooked, it’s often pounded into a sticky paste and formed into different shapes.
This process was thought to have originated in Ancient China and eventually introduced to Japan (who popularized mochi) during the Jomon period. In Japan, there is a traditional ceremony when making mochi called mochitsuki.
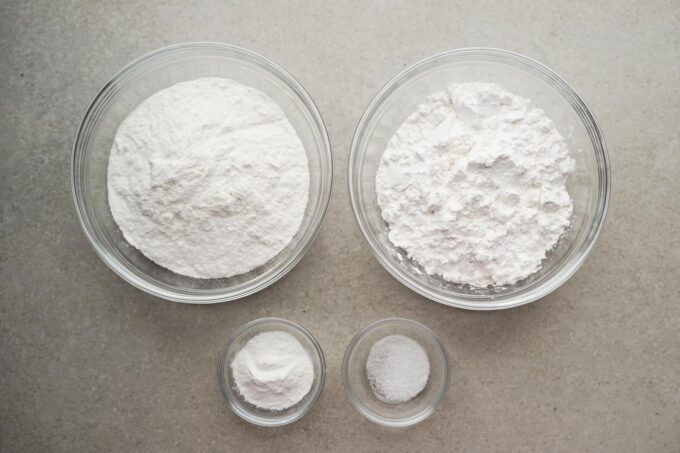
Ingredients in these mochi donuts
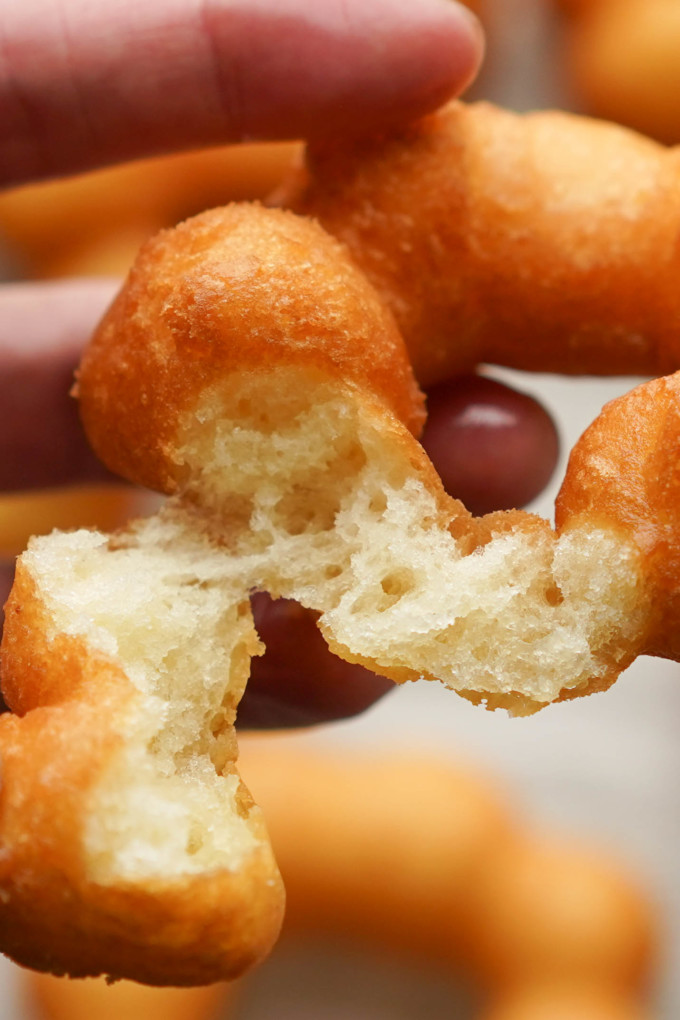
After eating so many different types of mochi donuts, I found that I like a slight bit of chew with an airy texture in the center and a crisp outer shell. Some of the other recipes I’ve tried have added all-purpose flour, which I didn’t like since it gave me a cakier texture.
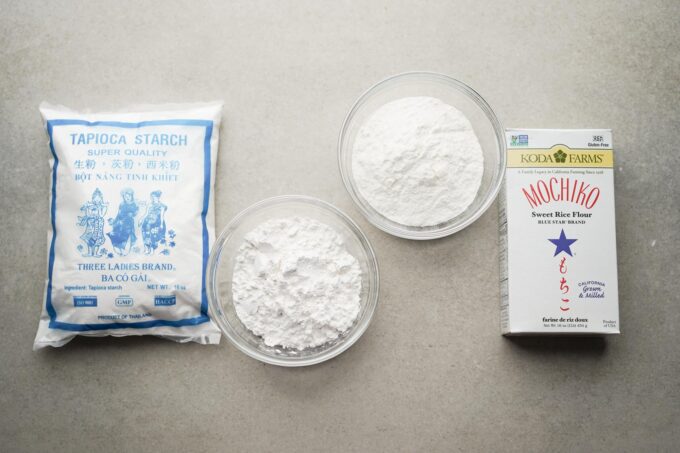
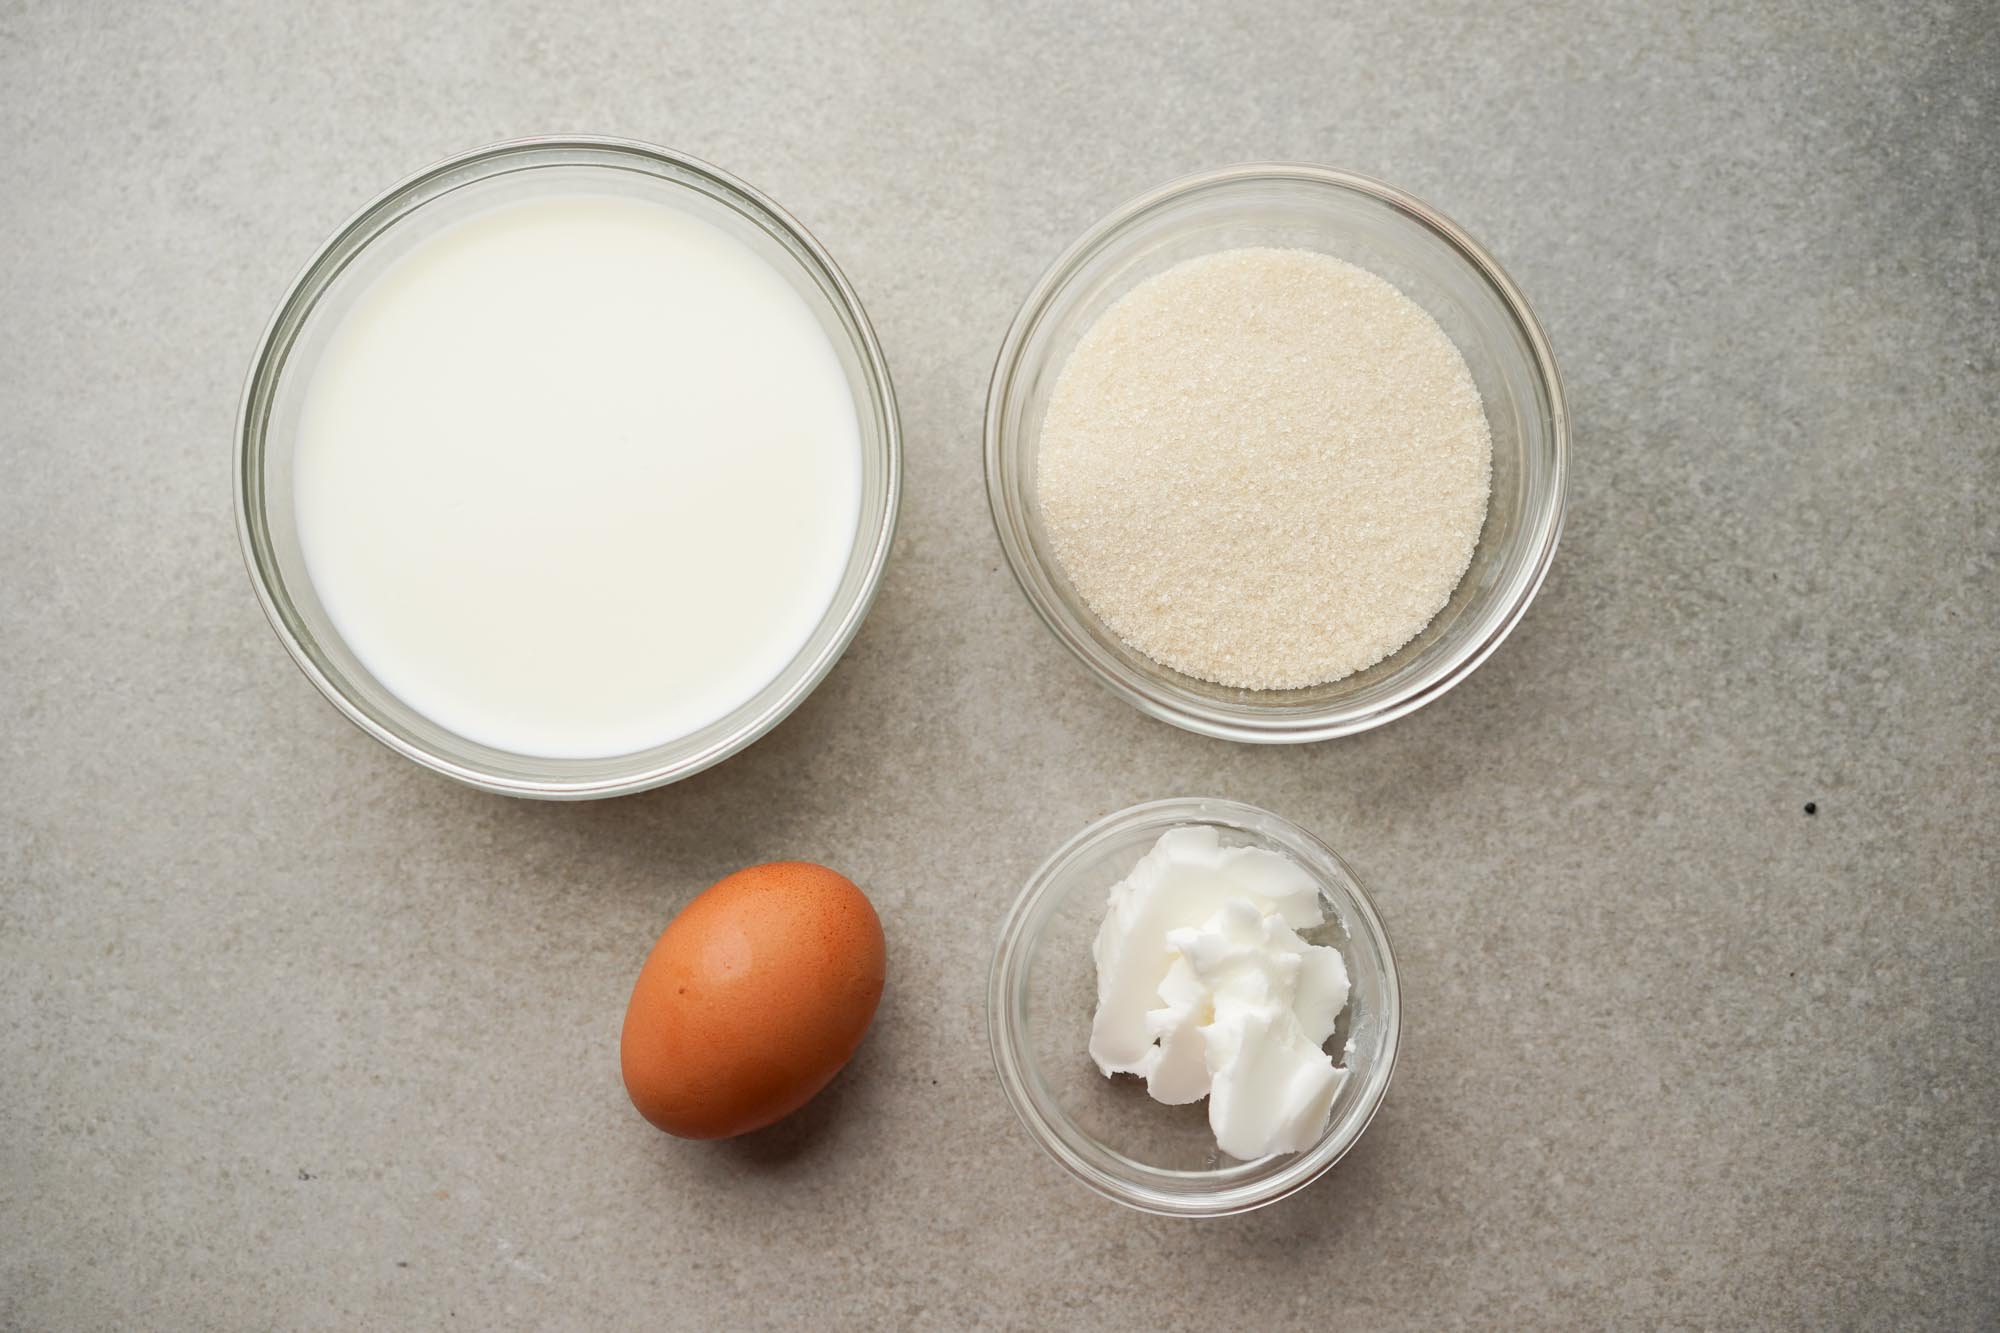
I used mochiko flour, tapioca starch, sugar, baking powder, salt, an egg, milk, and shortening to combat this soft texture. To get that signature chewy center, I used a combination of mochiko and tapioca starch. I also used vegetable shortening to get an extra crisp and crunchy outer layer. If you’ve noticed, this is a similar recipe to my pandan and ube waffles.
It’s important to note that mochiko flour is different from glutinous rice flour that you see at other Asian grocery stores–specifically the ones in the plastic bag with the green font. Mochiko is made from short-grain glutinous rice, whereas the other bag is made from long-grain glutinous rice–the texture in your donuts will change if you try to substitute these types of flours.
How to make flower donut rings FAST
After testing out various mochi donut recipes from other bloggers, I noticed that the texture of their donuts was never as good as the store-bought ones.
From watching youtube videos, I quickly learned that it was because most (if not all) donut stores had a dough texture that was completely thinner than many of the recipes I saw online.
The dough is so thin that they use a fancy extruder to produce an army of mochi donuts at a time, whereas many homemade recipes made thicker doughs that you had to painstakingly hand roll eight balls for each donut. I did not appreciate this laborious method, so I searched for a middle ground.
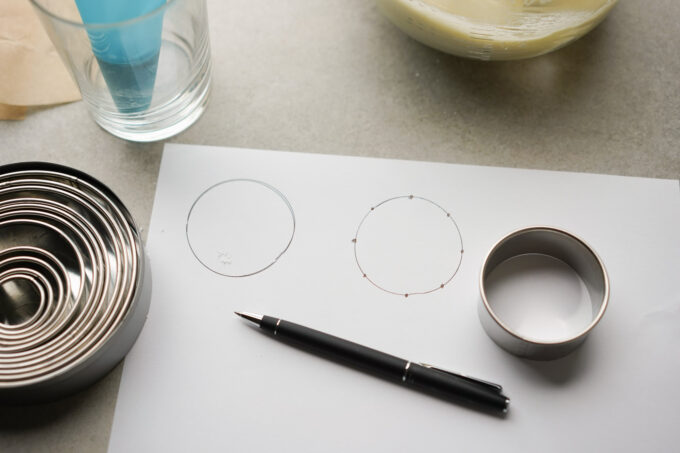
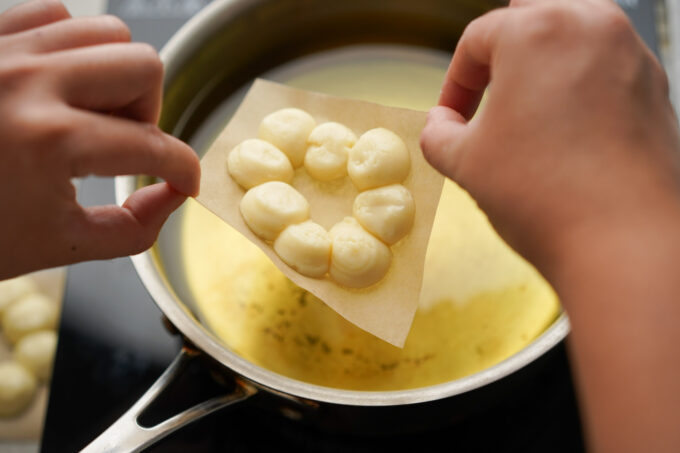
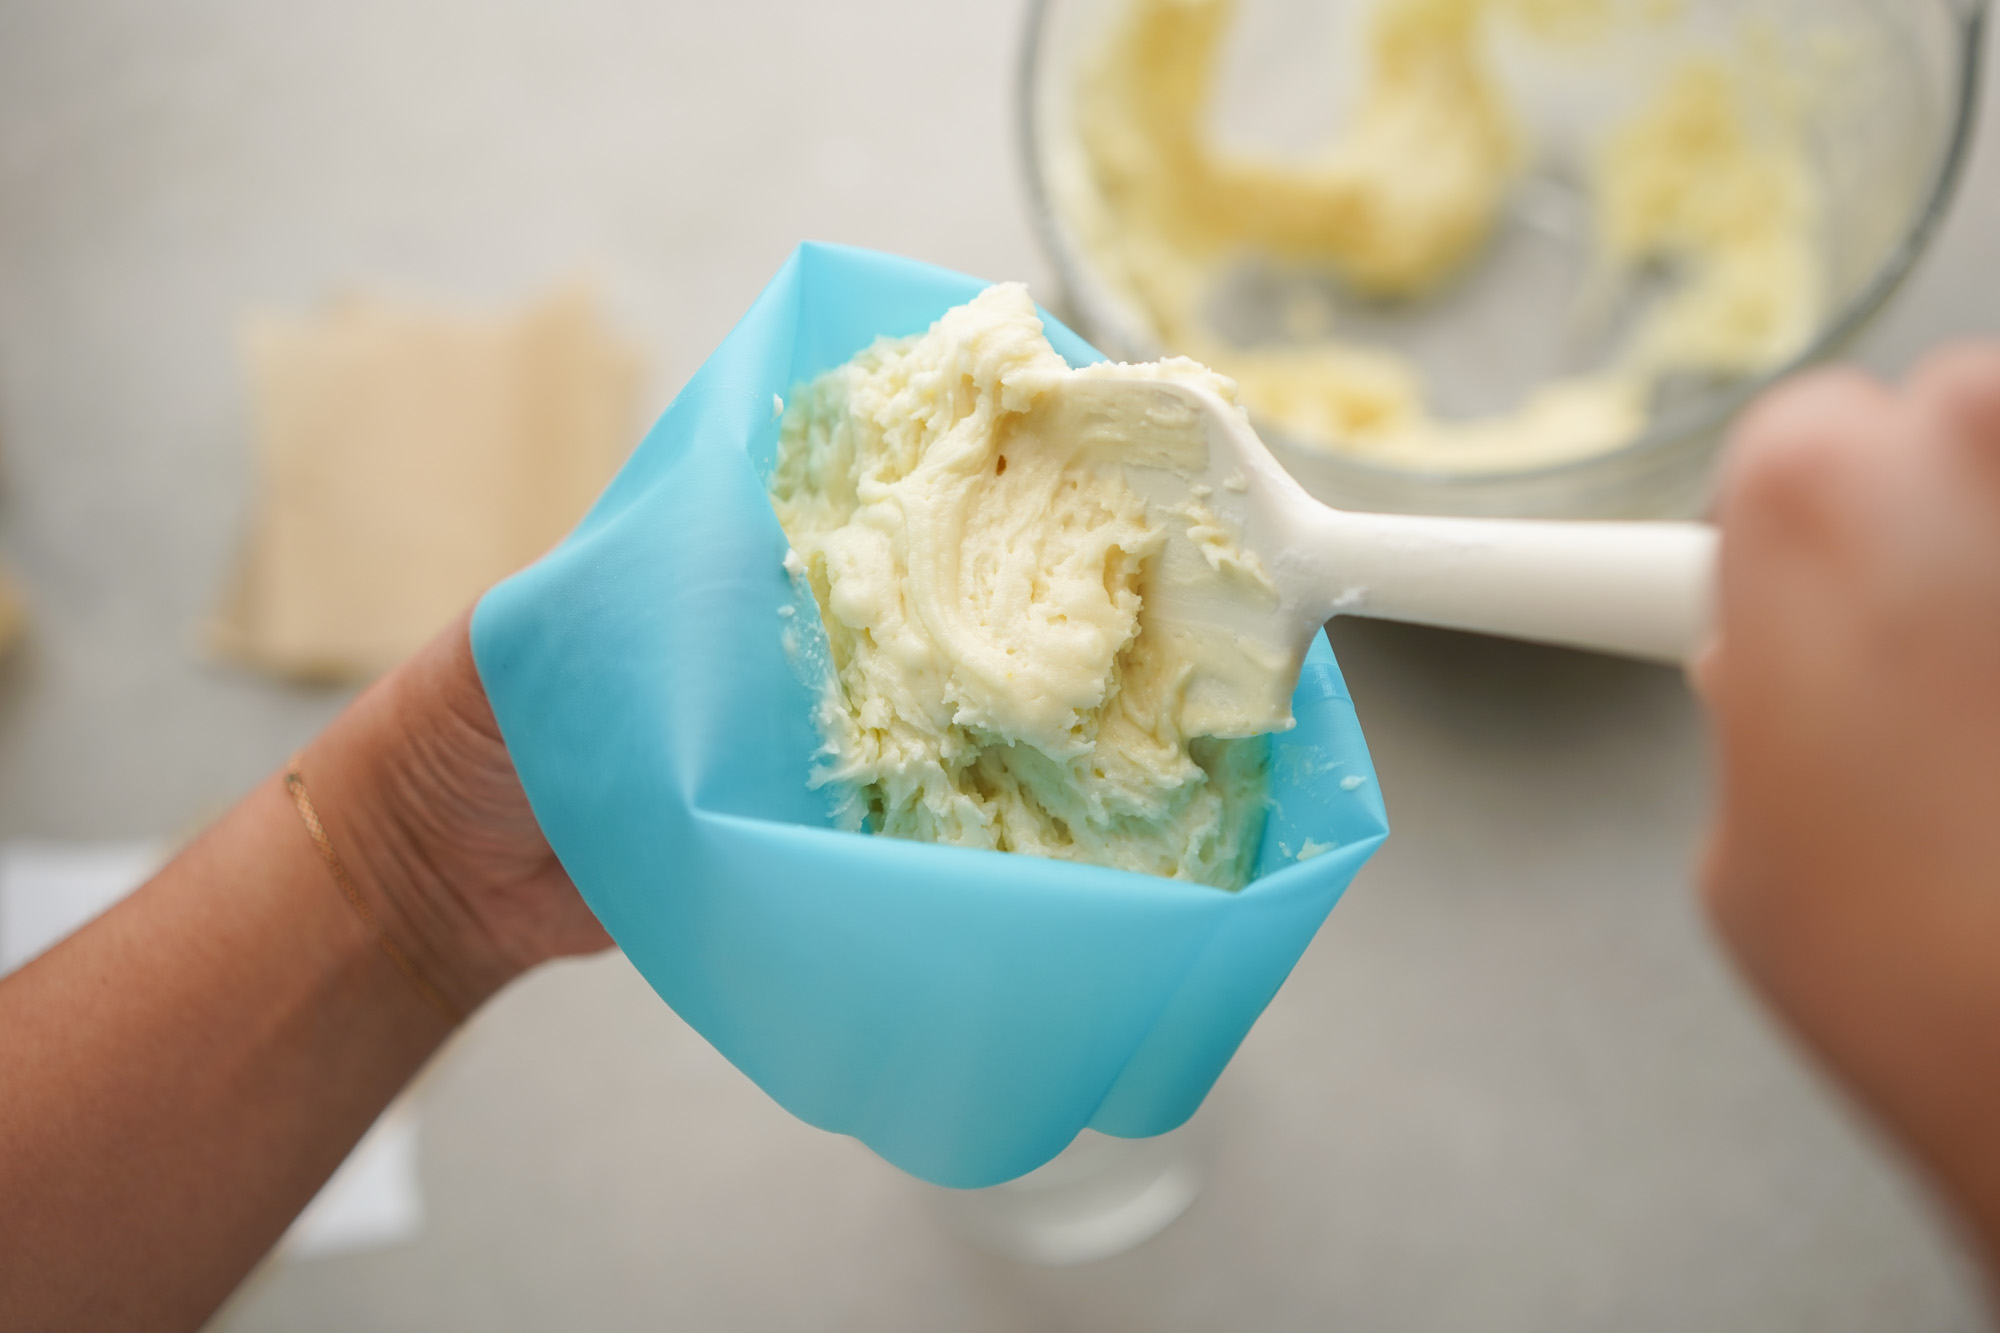
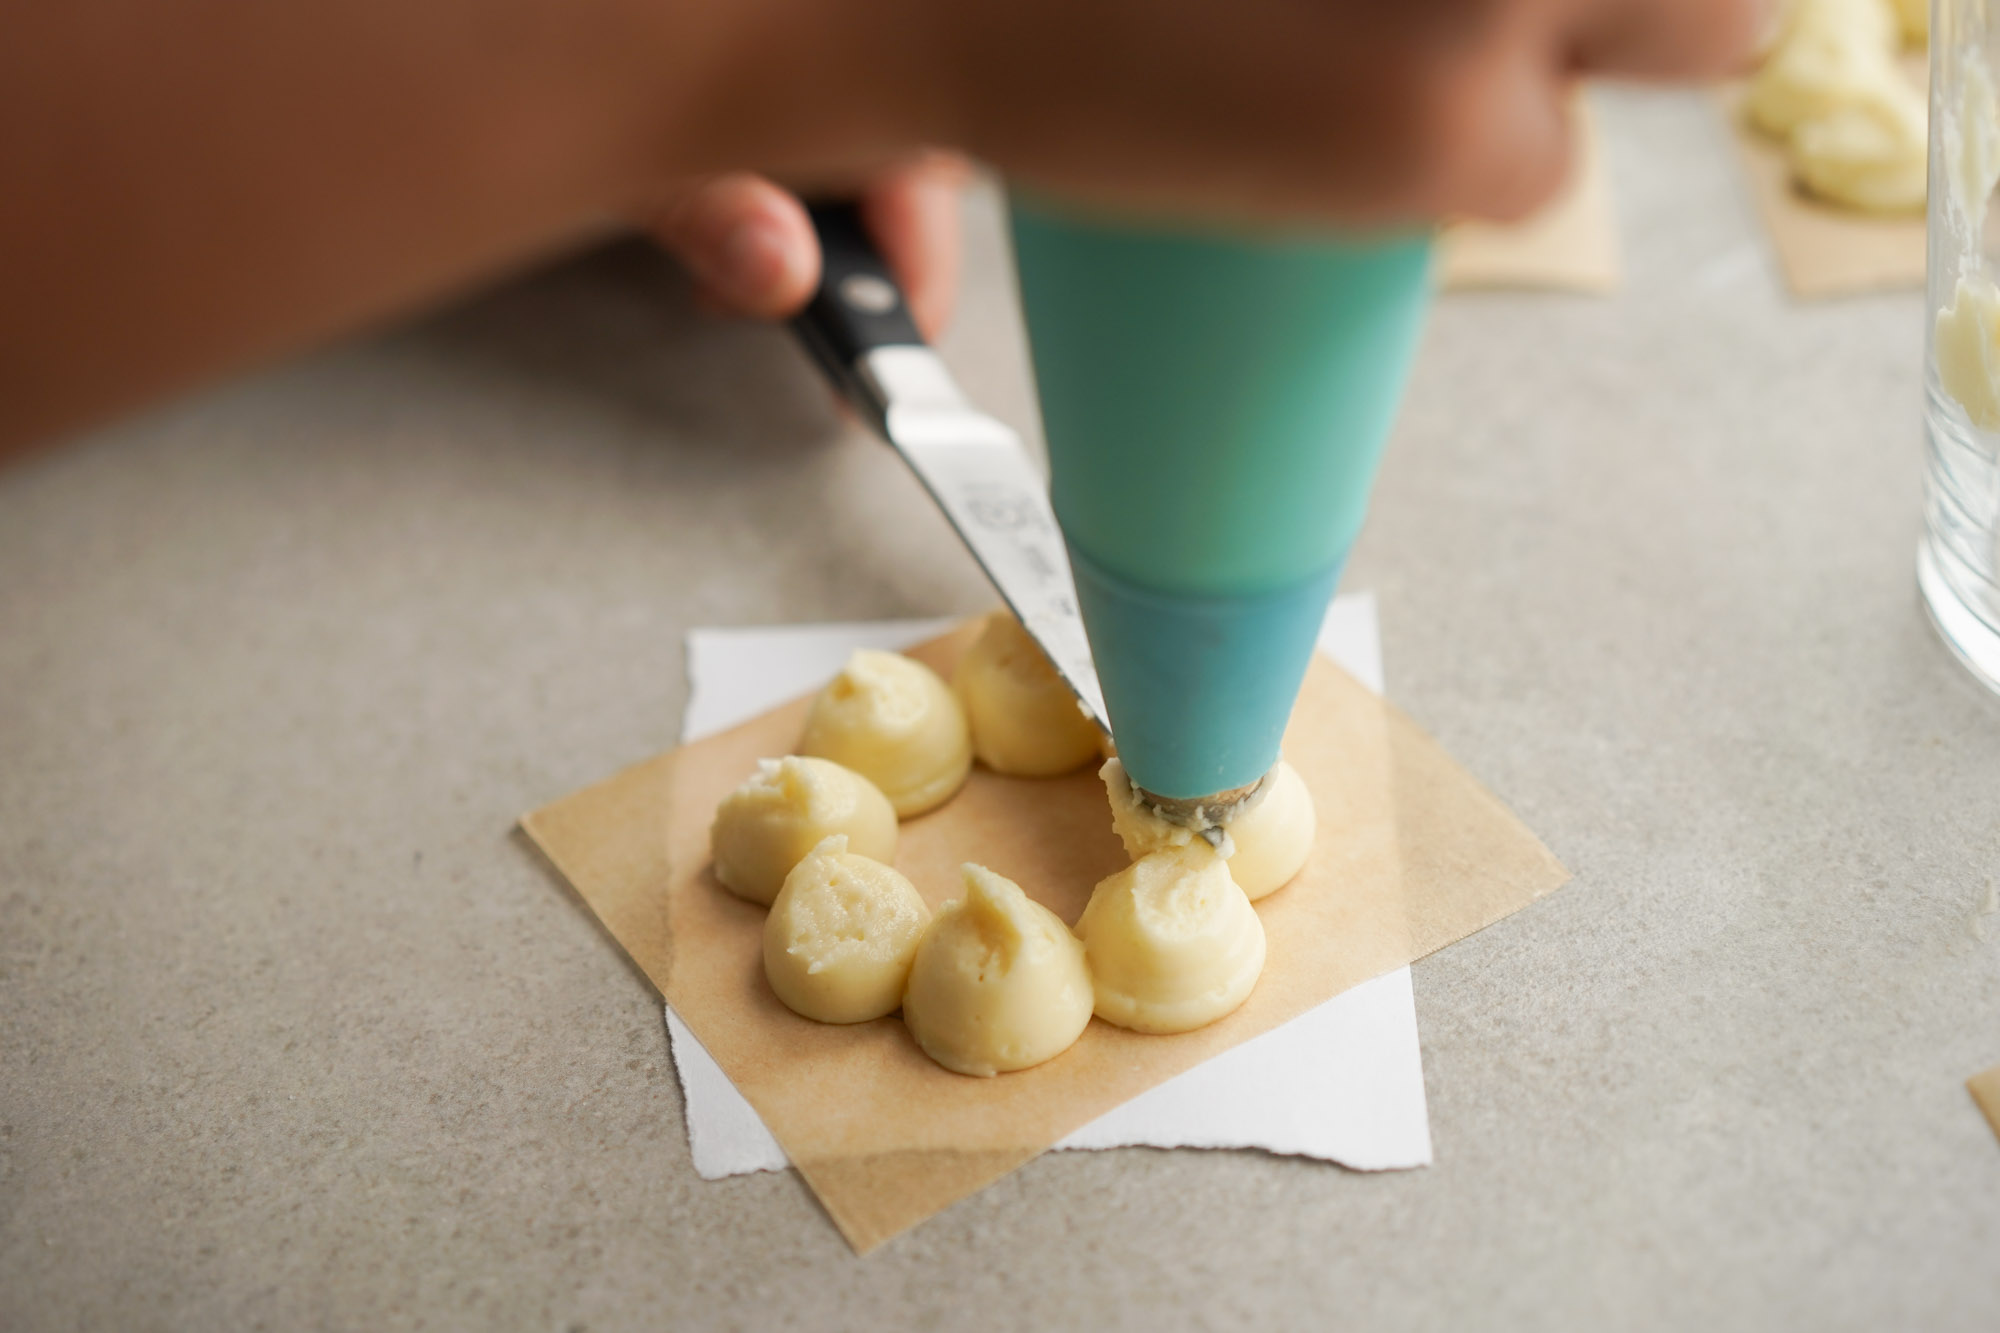
What I came up with gives you a goldilocks consistency of dough that you’re able to squeeze out with a piping bag and extra-large piping tip. To make these bubble ring donuts, I gently squeezed one ring of 8 balls on a piece of parchment paper.

A helpful tip is to use a paring knife to slice off the dough from the piping bag and release it onto the parchment paper. I find this makes a cleaner ball and I also clean the knife in between each cut. If you want to further round out your donut, dip your finger into water and carefully shape the tops of each ball so it’s smooth. If you don’t have a piping bag or tip, you can easily use a one-gallon ziplock bag and cut the corner to create a bag.
You absolutely can make the traditional donut ring shape as well, I just assume the bubble shape is for cuteness and you get more surface area for an extra crispy texture–not to mention, they’re fun to pull apart and eat!
How to fry the mochi donuts
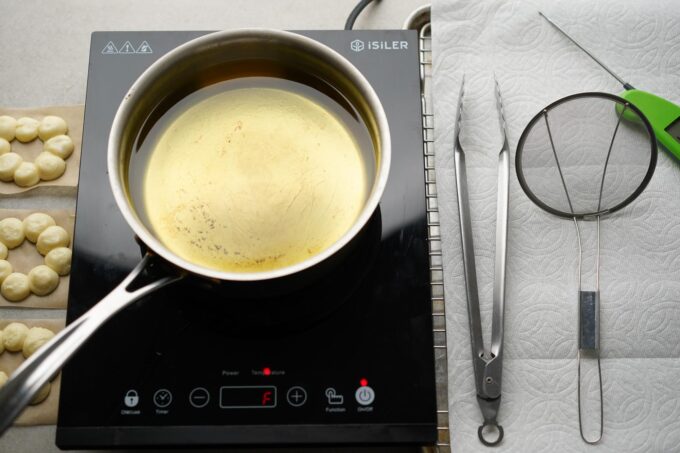
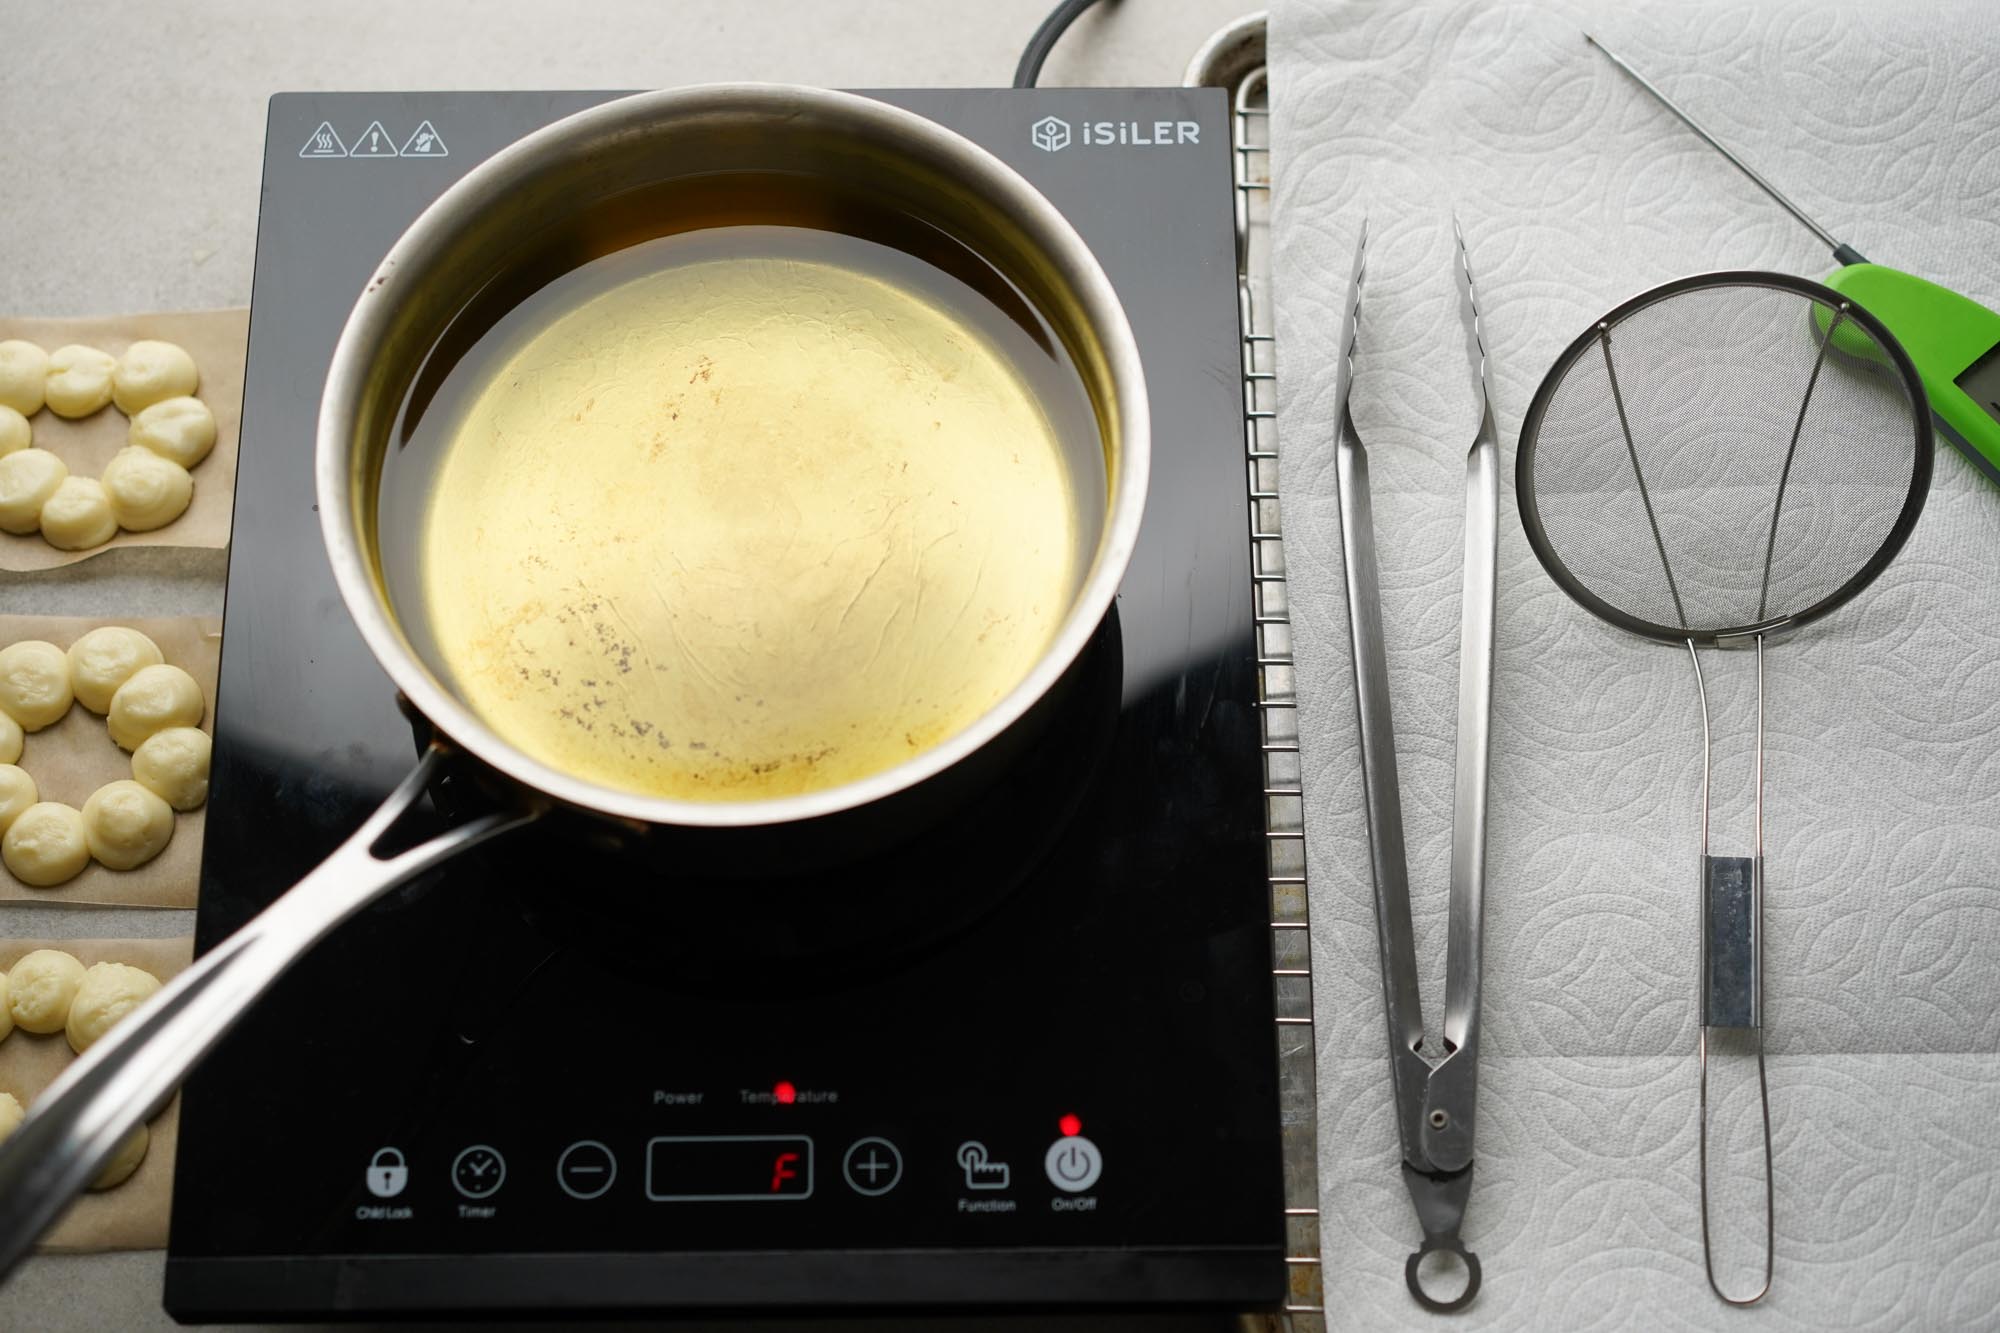
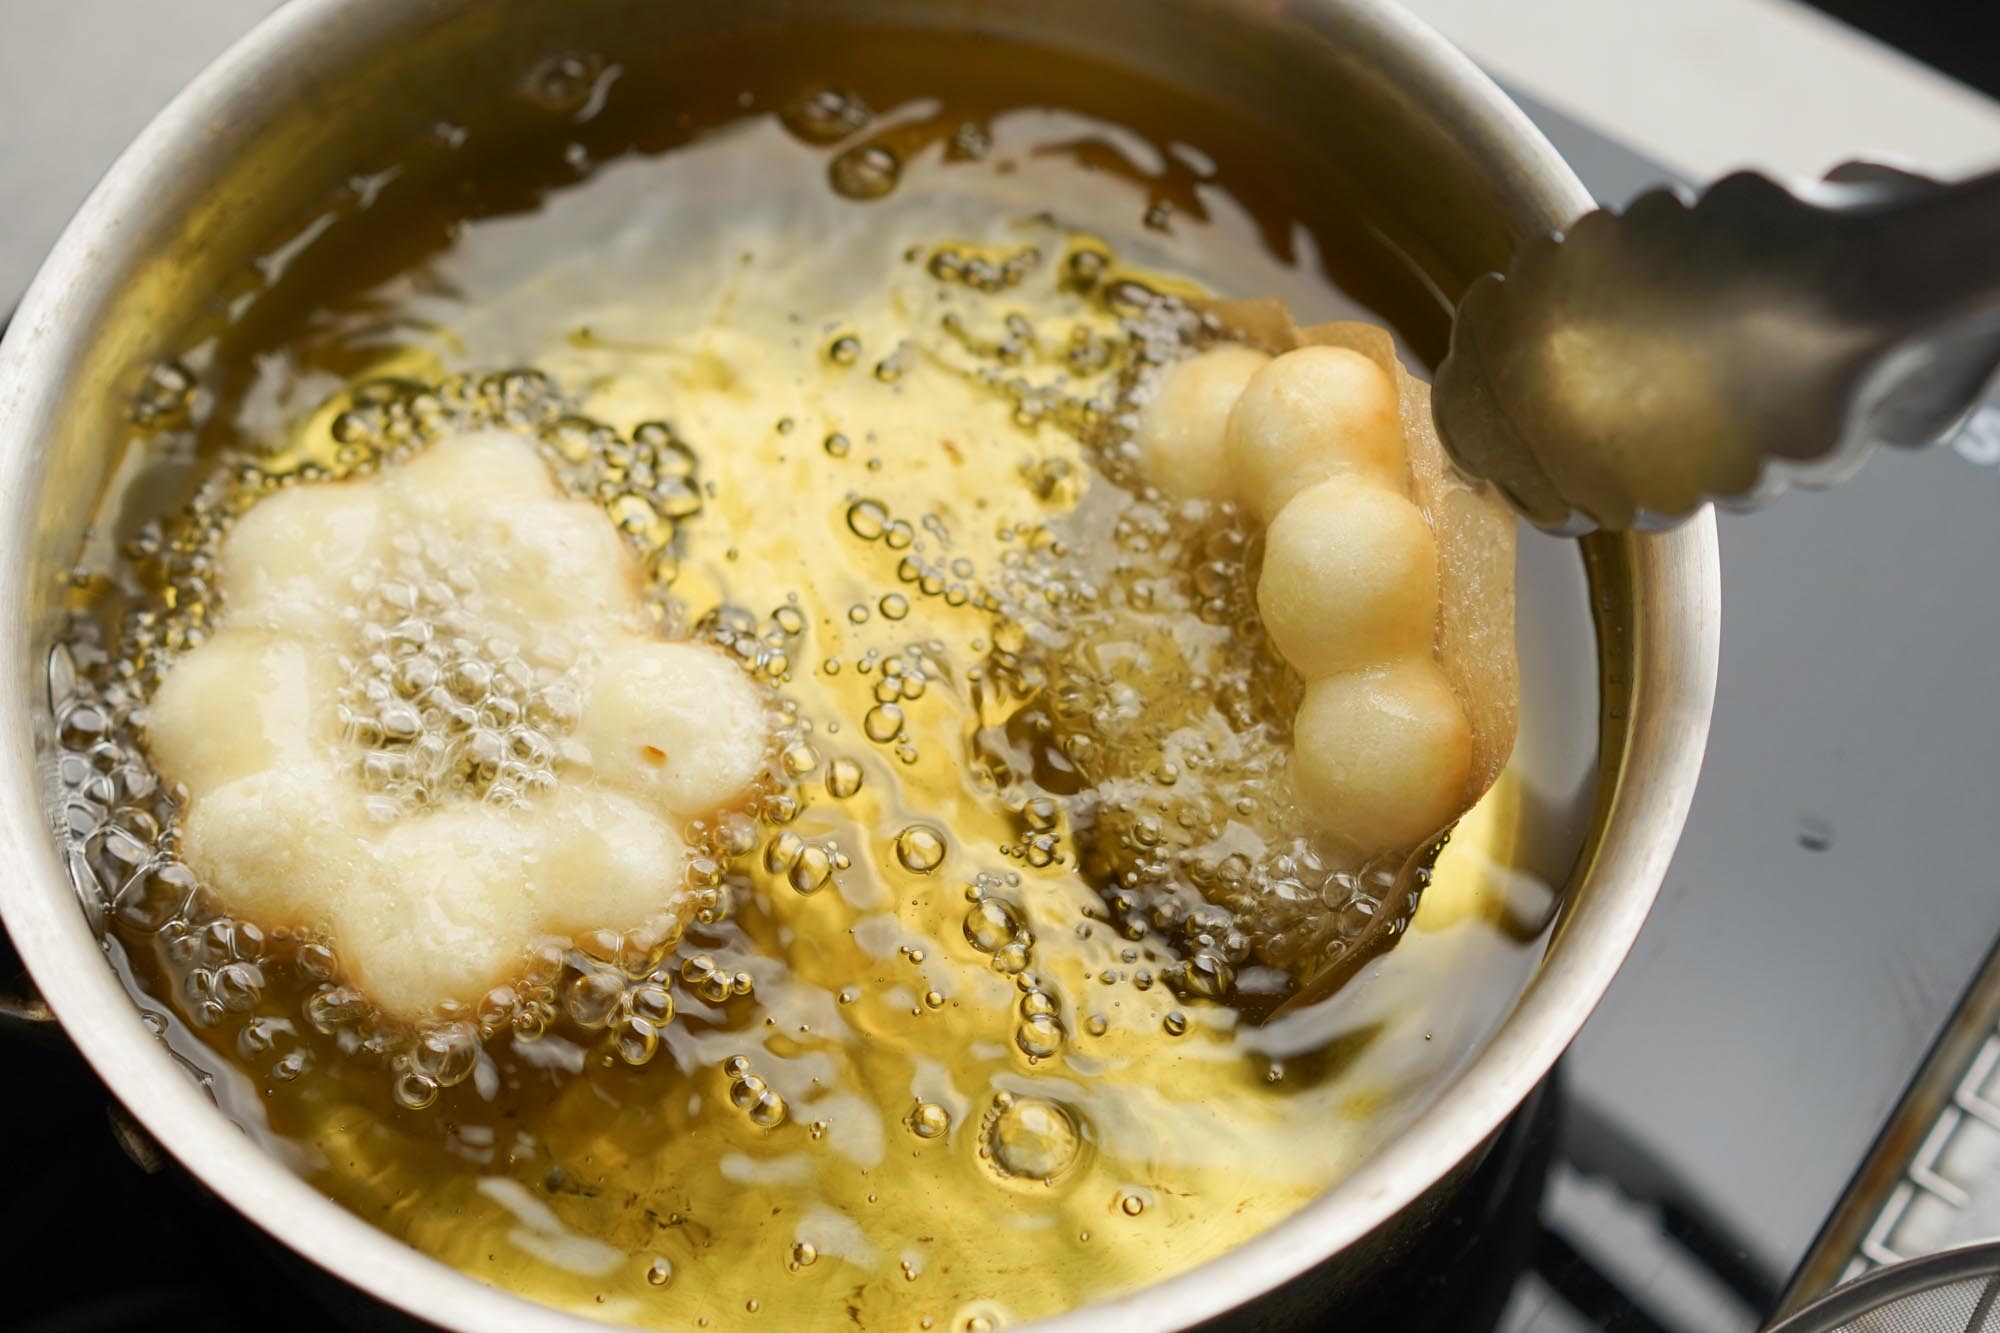
To fry mochi donuts, I like to use vegetable oil (or similar neutral cooking oil) because it’s fairly inexpensive, you can find it in most places, and it has a high smoke point. I add about 2 inches of oil from the bottom to make sure my donuts are fully covered while frying and heat it to 350 ℉. Use an instant-read thermometer to make sure you keep the oil at the right temp.
Carefully lift the parchment paper to transfer the donut and lower it to the oil and gently push the donut so it’s submerged. I wait about 30 seconds for the donuts to release the parchment paper and then fish out the paper with tongs.

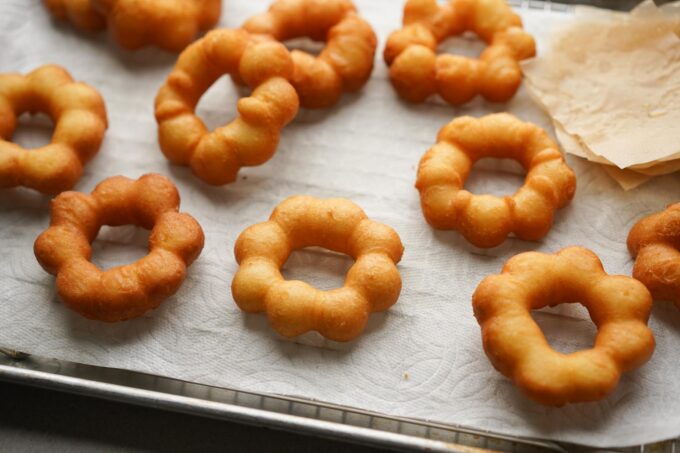
Flip the donut and use your strainer or tongs to submerge the donut completely for about 1 minute, then flip again. Remove once both sides are evenly cooked a light golden brown and transfer it on a paper towel-lined rack. It’s important to remember that since there is no wheat flour in this recipe, the donuts will not brown like normal donuts so you want to remove them when they’re lightly golden.
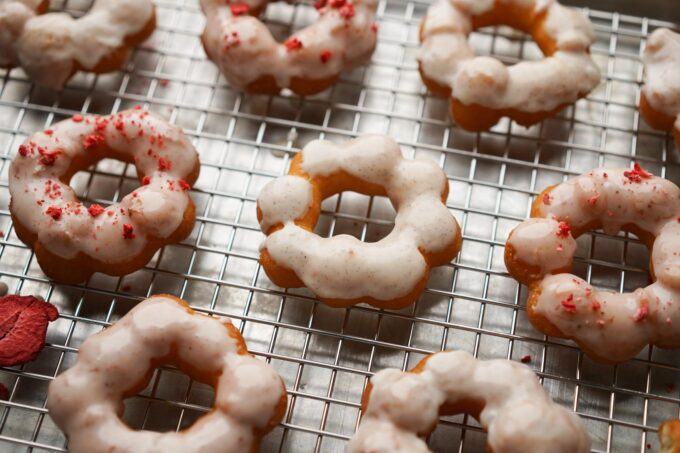
How to make the icing
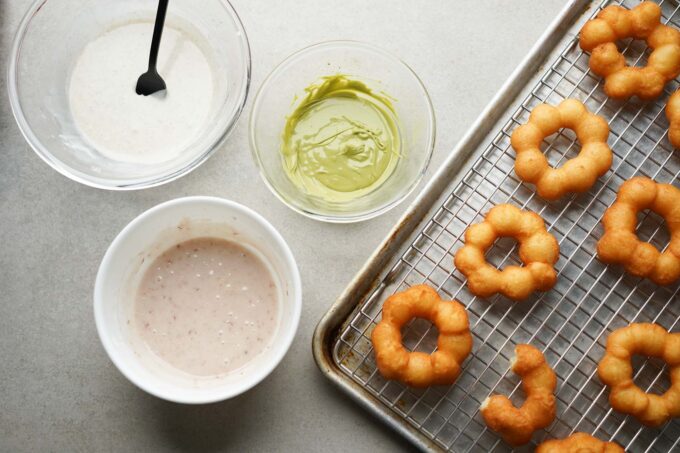
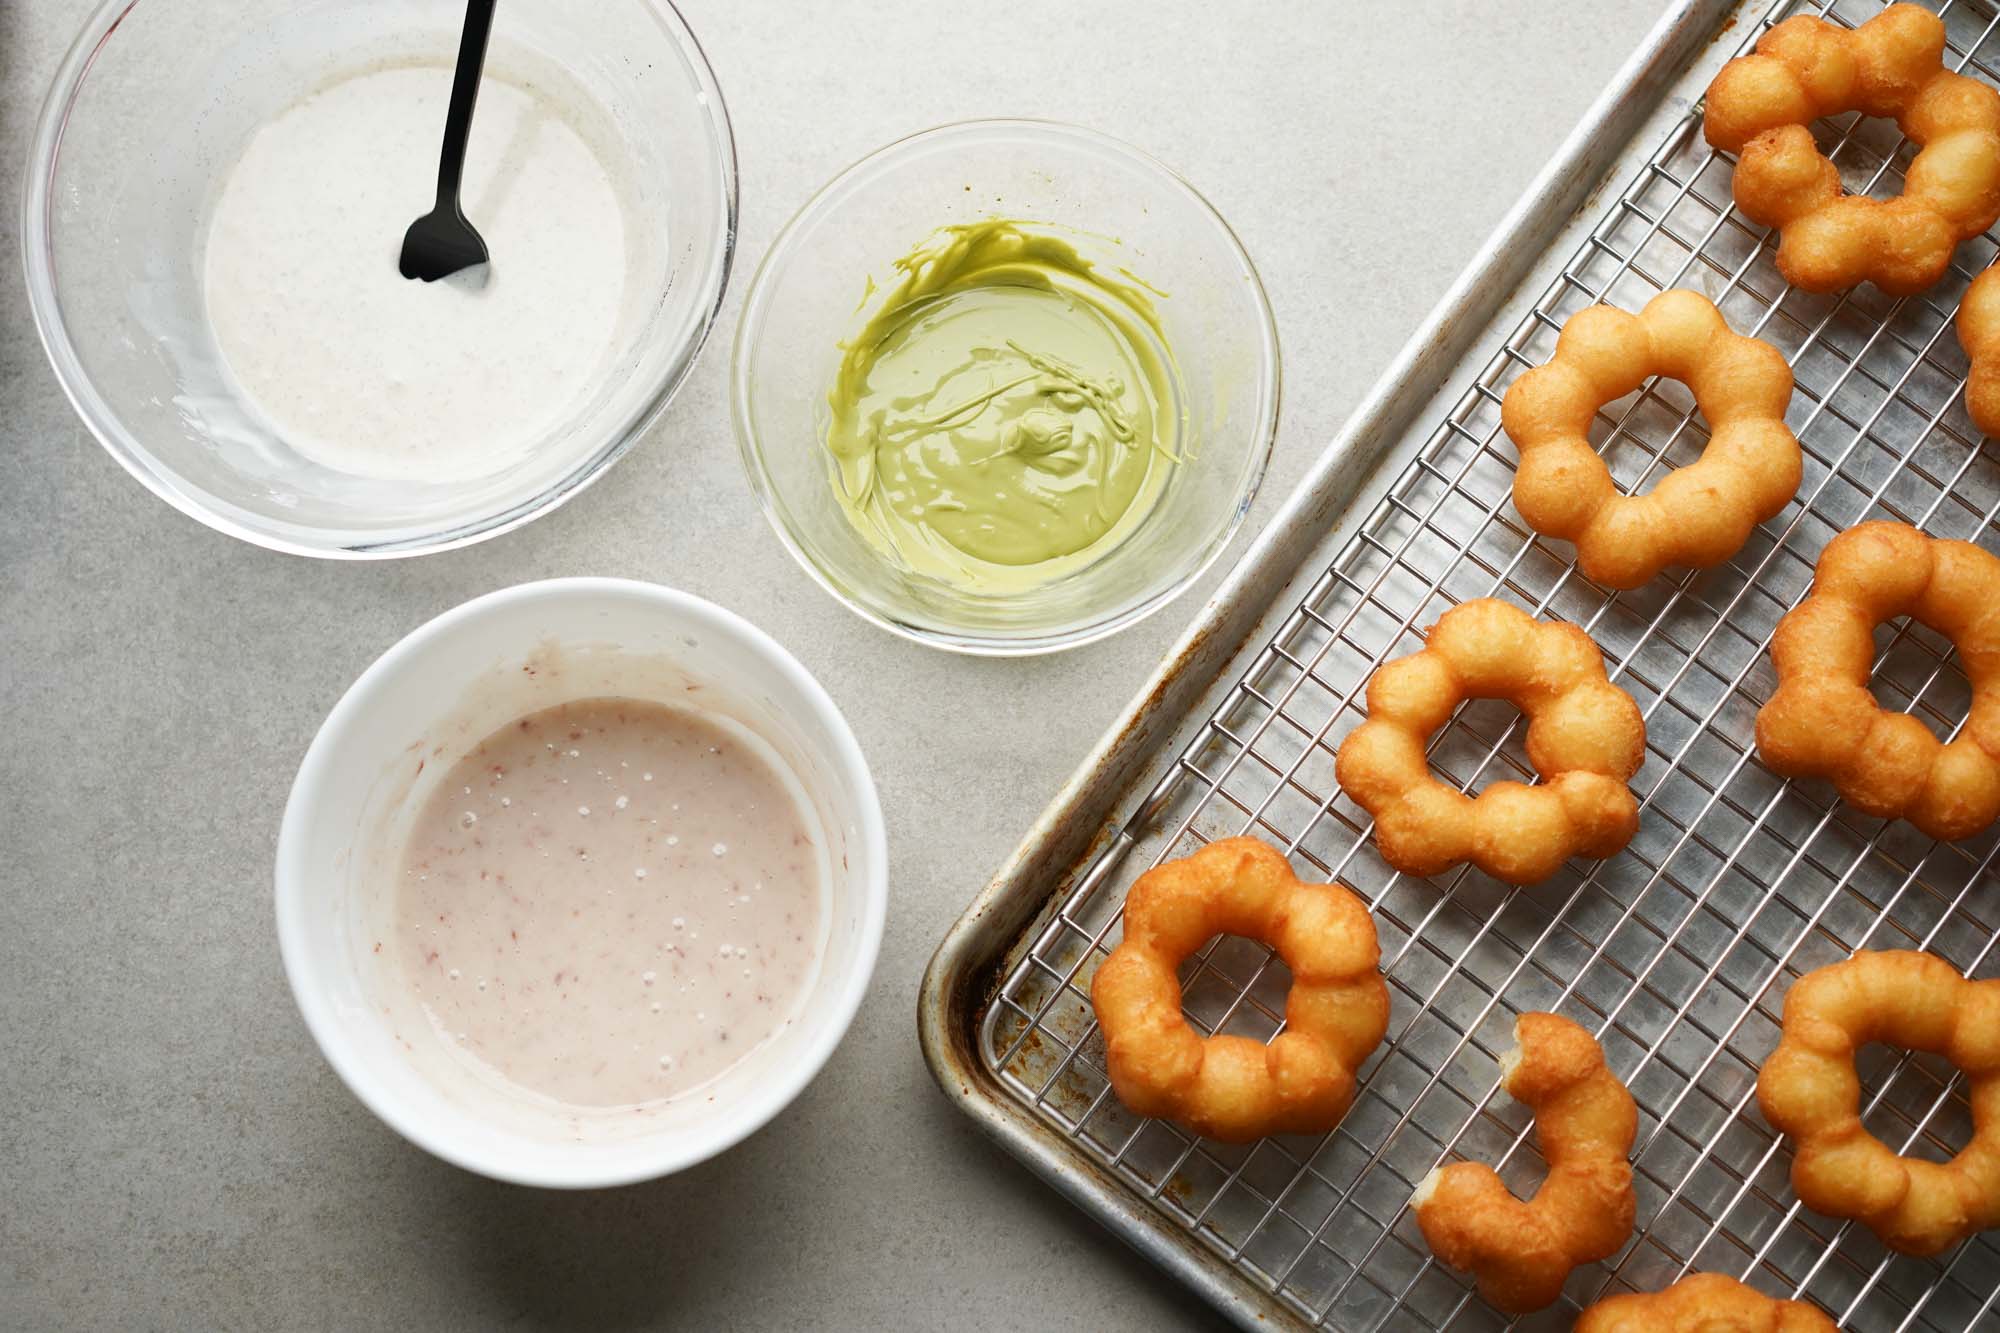
The icing is one of my favorite parts about donuts because you can have so much fun adding different flavors. Some of my favorite flavors are strawberry and vanilla bean.
For vanilla bean, I use powdered sugar, a few splashes of milk, and vanilla bean paste. It’s best to use a whisk when making this glaze because you want to get out all of the lumps. For the strawberry, I add powdered sugar, a few splashes of milk, and a little dollop of strawberry preserves.

You want to make sure the consistency is slightly thin so it won’t be too gloopy once you dip the donuts in. If it’s a little thick, I add a little more milk to thin it out. If it’s too thin, I add a little more powdered sugar. You want it thin enough so it coats the contours of the donut, but not so thin that it will drip down the sides after turning the donut right side up.
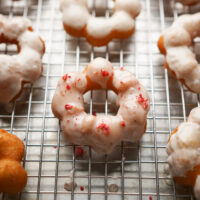
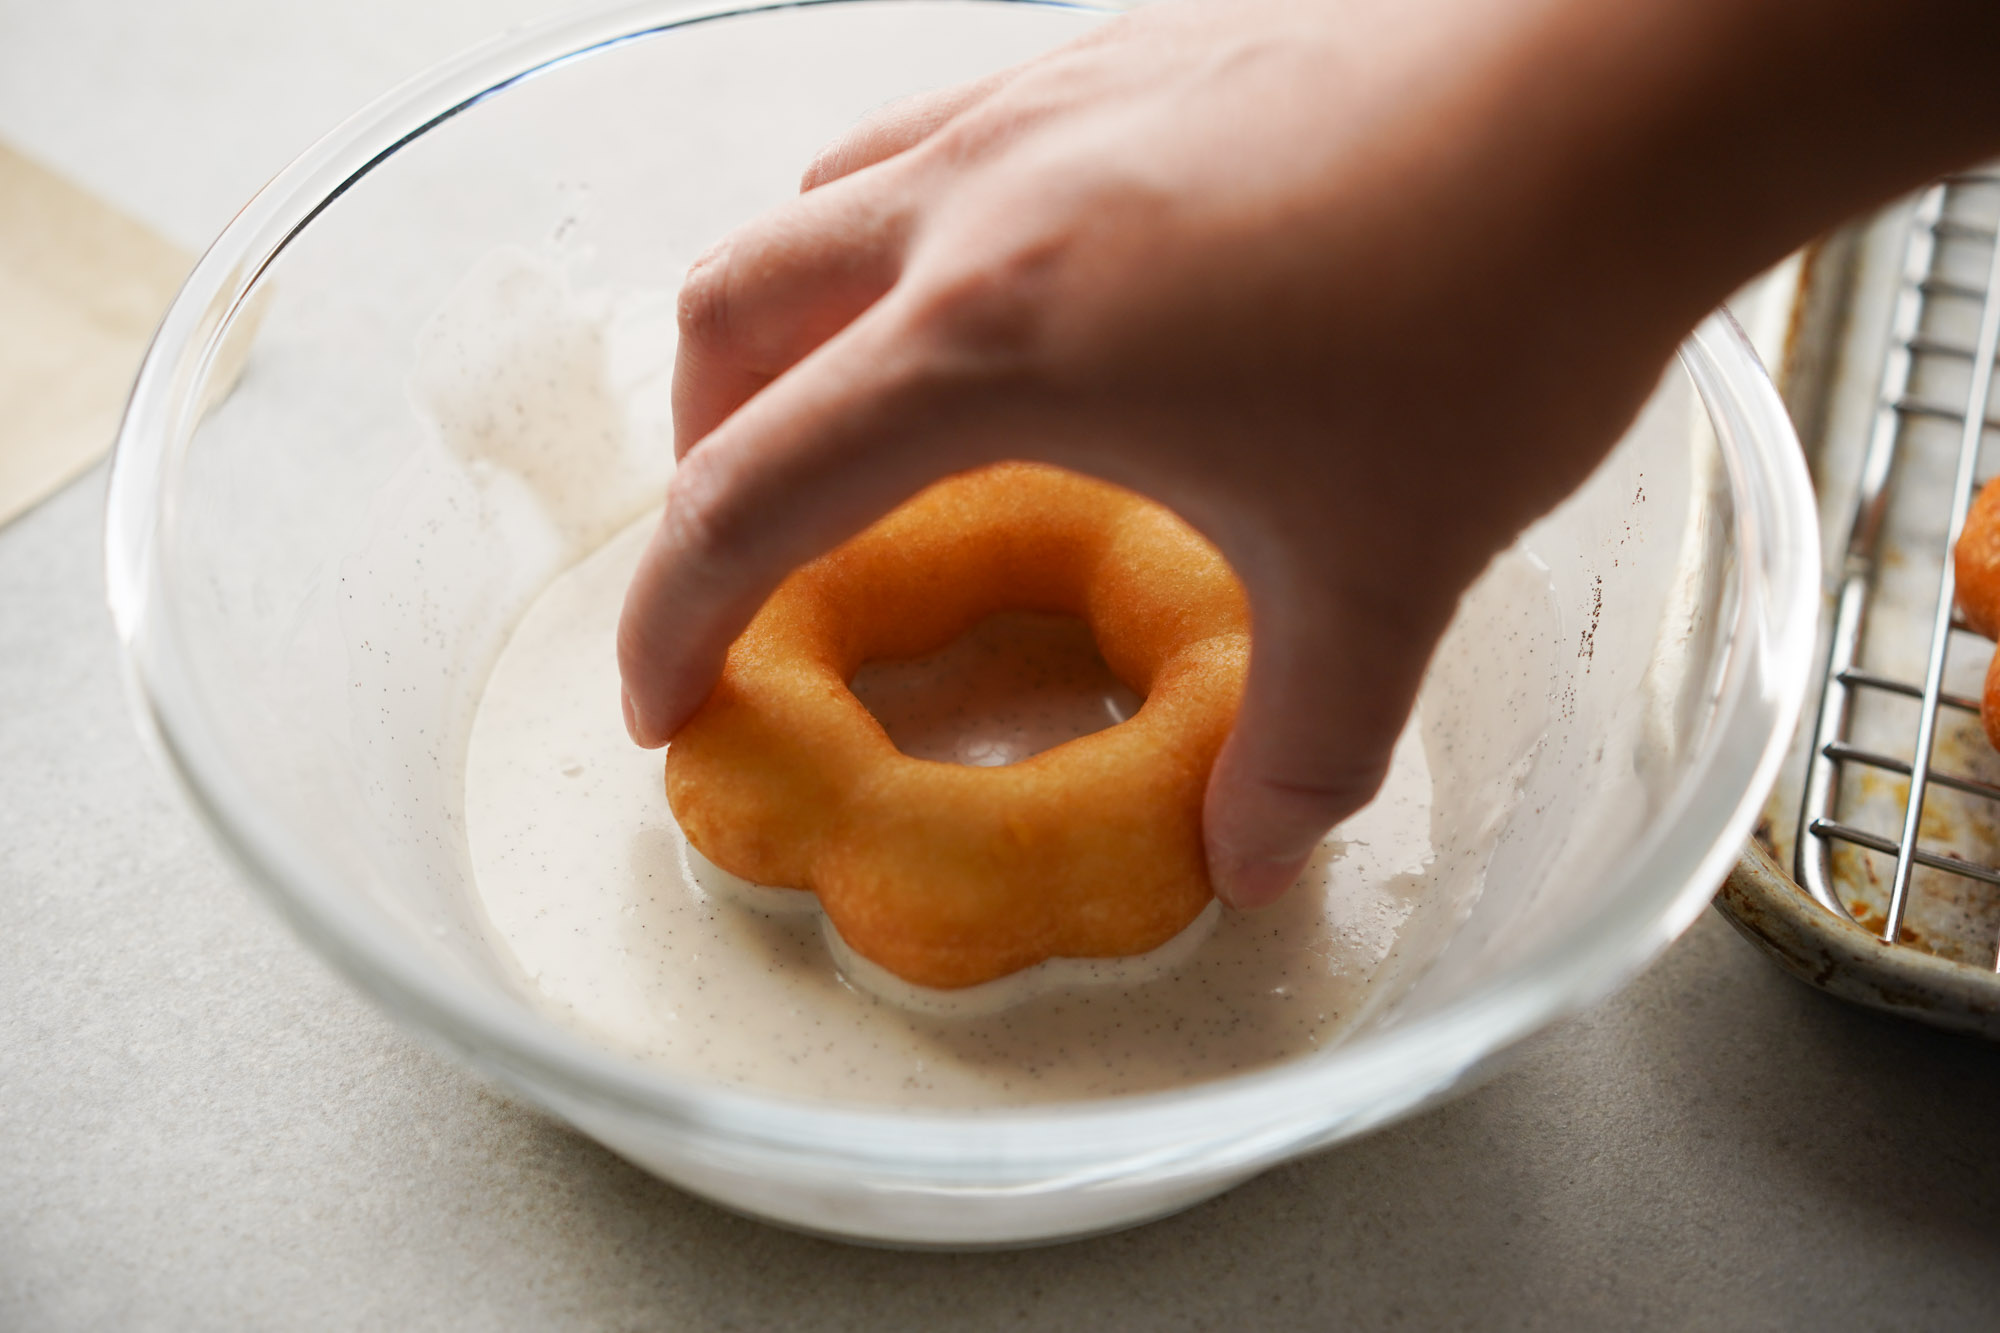
Once the donuts are out of the fryer and drain off the excess oil on a rack, I dip them straight into the icing and leave them to rest on the rack again for about 1 minute. This allows the glaze to harden slightly.
How to serve and store mochi donuts
Serve these fresh donuts with some cà phê sữa đá or iced coconut coffee and impress your friends! It’s best to eat them fresh and savor the crispy and chewy textures.
What are mochi donuts made of?
Mochi donuts are typically made of mochiko flour (a Japanese glutinous short-grain rice flour), tapioca starch, and other ingredients like sugar, milk, and baking powder among other things.
Is mochiko the same as glutinous rice flour?
Mochiko flour is different from other types of glutinous rice flour. For this recipe, I used Koda Farms Mochiko flour because it’s made of glutinous Japanese short-grain rice.
This differs from other types of glutinous rice flour you may find at an Asian grocery store, like Erawan glutinous rice flour, which typically comes in a plastic bag with a green label on the front. This type of glutinous rice flour is made of long-grain sticky glutinous rice that typically comes from Thailand. Buying the wrong type of glutinous rice will affect the texture of mochi donuts.
Are Mochi donuts good the next day?
Mochi donuts are best eaten the same day because the texture and consistency change a lot. I would not recommend saving them or making them ahead.
Mochi Donuts (Crispy Outside, Chewy Inside Pon de Ring Donuts)
Ingredients
Donuts
- 150 g (1 c & 1 tbsp) mochiko flour
- 115 g (¾ c & 3 tbsp) tapioca starch
- 8 g (1 ¾ tsp) baking powder
- .8 g (½ tsp) salt
- 75 g (⅓ c) white granulated sugar
- 1 large egg
- 150 g (5 fl oz) whole milk
- 24 g (2 tbsp) vegetable shortening
- neutral cooking oil vegetable oil preferred
Vanilla bean glaze
- 120 g (1 c) powdered sugar add more if necessary
- 48 g (1 ½ fl oz) whole milk add more if necessary
- ½ tsp vanilla bean paste
Strawberry glaze
- 120 g (1 c) powdered sugar add more if necessary
- 32 g (1 fl oz) whole milk add more if necessary
- 1 tsp strawberry preserves or jam
Equipment Used
- mixing bowls
- spatula
- Piping bag & 808 piping tip (or 1 gallon ziplock bag)
- Paring knife
- parchment paper
- Pot
- paper towels
- cooling rack
- sheet pan
Instructions
Donuts
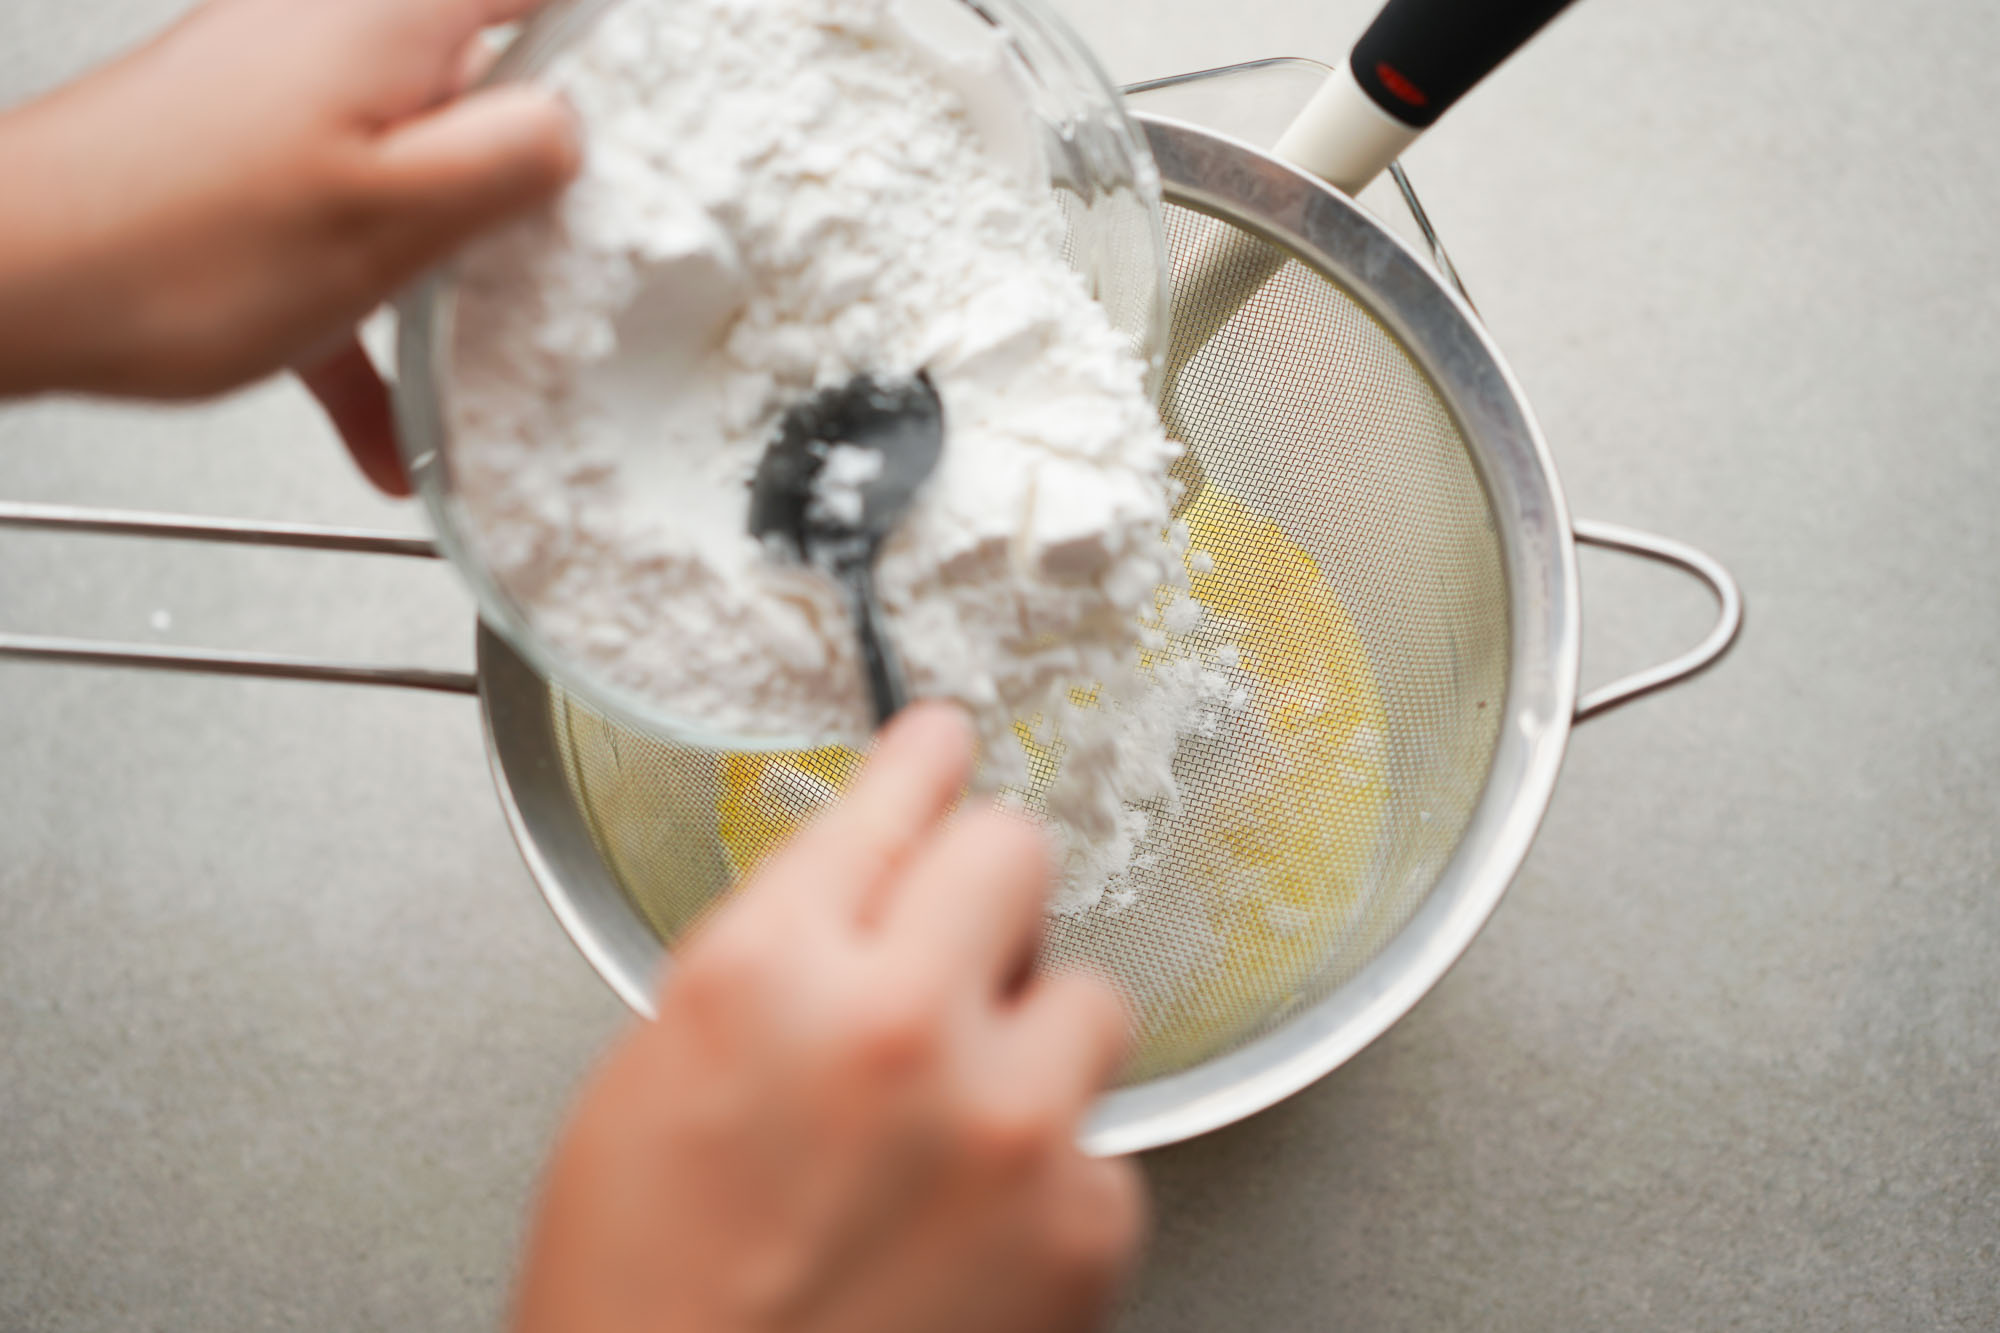
- Combine the dry ingredients, the mochiko flour, tapioca starch, baking powder, and salt in a bowl and mix.
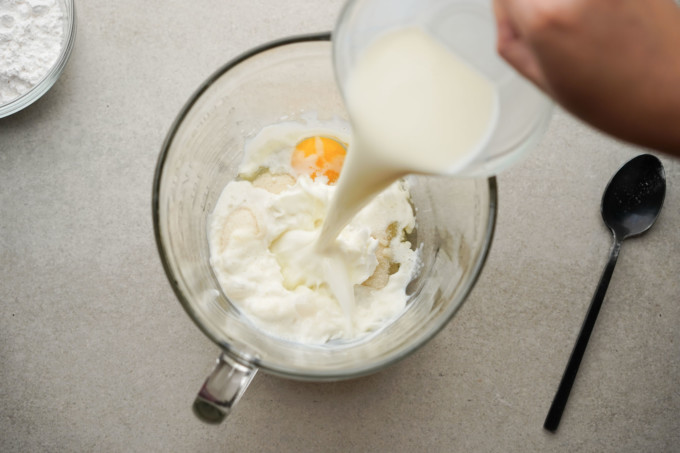
- Combine wet ingredients. In a separate large mixing bowl, combine the sugar, egg, milk, and vegetable oil until it’s fully combined. The vegetable shortening will be pea sized.

- Sift the dry ingredients into the large mixing bowl.

- Use a spatula to mix and stir the donut dough until it’s fully combined, making sure to incorporate the shortening as much as you can.

- Cut parchment paper into 3 x 3 inch squares. To make piping easier, create a template of a 2 ½ inch circle on a plain piece of paper and tape it to the table. Make 8 dots evenly spaced on the circle, this will be the spots where you will pipe each ball so that you create an 8-ball ring. Add one piece of parchment over and follow dots with the piping bag.
- Add a size 808 piping tip into a piping bag. Fill the piping bag with donut dough and squeeze the opening until the dough comes out of the tip.

- Squeeze out about 1 tsp of dough on each dot on the parchment paper. Use a paring knife or butter knife to slice off the dough from the tip of the piping bag for a clean cut. I like to wipe the knife every time I make a cut. Repeat until you do all 8 dots. At the end, you should have an 8-ring donut and all the balls should connect slightly to each other. Repeat with all the donuts.
- Add at least 2 inches of oil in a heavy bottomed pot over medium-high heat. Preheat the oil to 350 ℉.
- Carefully lower one parchment paper of donut down into the heated oil. My 3 ½ quart pot can fit two donuts per batch. Do not try to crowd the donuts.
- After about 1 minute, use tongs to remove the parchment, it should easily come off. Use a strainer to turn the donut around and gently press the donut into the oil so it’s submerged. Continue to cook for about another minute or until it’s light brown. There is no gluten flour in this batter so it will not turn super brown.
- Use the strainer to transfer the donut onto a paper towel-lined rack over a sheet pan. Repeat with all the donuts.


Glazes
- Vanilla bean: Combine the powdered sugar, milk, and vanilla bean in a bowl with a whisk. The thickness needs to be similar to maple syrup. To make it thicker, add more powdered sugar. To make it thinner, add more milk slowly.
- Strawberry: Combine the powdered sugar, milk, and strawberry preserves in a bowl with a whisk. The thickness needs to be similar to maple syrup. To make it thicker, add more powdered sugar. To make it thinner, add more milk slowly.
- Assembly: Take one fresh donut (slightly warm after cooling on the rack) and dip it into a glaze and place it back on the cooling rack without the paper towel. Let it rest for 1 minute to allow the glaze to harden. Repeat with the rest of the donuts.
- Serve immediately.


Could you make-ahead the dough the night before, to fry in the morning?
I haven’t tried this, but you’d have to manage it not drying out for one–not sure what else might change overnight!
Is tapioca starch the same as tapioca flour?
Tapioca starch and tapioca flour are the same. You might see different brands use different words, but they are the same.
Despite following the recipe down to the gram, my dough consistently seems to be wayyy thinner than the dough shown here or videos I’ve watching using this recipe. Any thoughts/suggestions as to why?
Would it be possible that you used regular rice flour or sweet glutinous flour in place of Mochiko powder? This is my only guess as to what’s causing the issue.
This recipe is legit! It was so easy and delicious. To anyone wondering, it worked well when I made the dough ahead. I piped them, placed them on a tray and tied the whole thing up in a recycling bag. I stored the tray in the fridge and fried them from cold in the morning. 10/10 recipe, I will be making again.
Thank you for sharing!
Looking forward to try this recipe! Is it possible to substitute the shortening with oil? How will this affect the quantity Eg 24g of shortening to ___oil?
Just that shortening isn’t something I use often so rather not purchase a block if just using such a small amount. Thanks!
I haven’t tested using oil, sorry!
I followed exact measurements for ingredients but why is my batter consistency watery?
I have not had watery results with this recipe. Are you using Mochiko flour and tapioca starch/flour?
Havent’ tried them yet but the directions look super easy to follow and after leaving Southeast Seattle a few months ago it’s been horrible living without mochi donuts, so I’m finally going to make them myself (since before moving I loaded upon Mochiko flour among other ingredients that are harder to come by in our smaller town!). thanks!