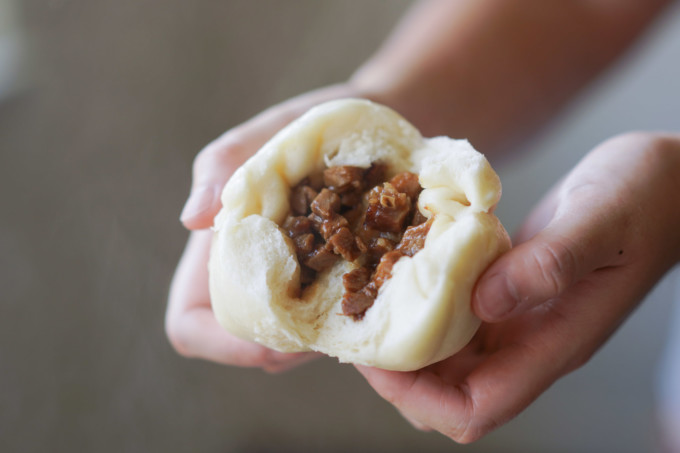
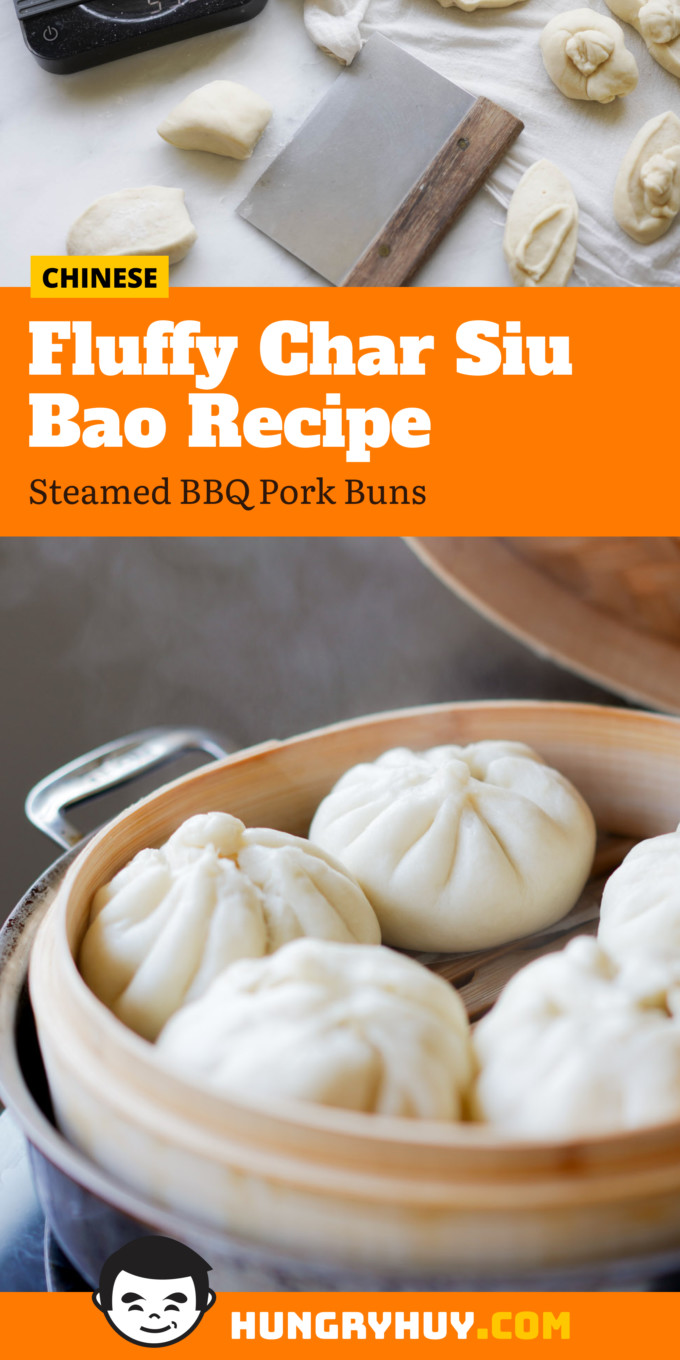
Fluffy steamed buns filled with a savory, and slightly sweet and oozing char siu pork filling–it’s everything you would want from char siu bao and brings back memories of my dad buying these little pieces of heaven for me as a kid along with the Filipino version, siopao asado.
These steamed pork buns are not only a popular dim sum favorite, but they’re also great for making ahead of time, freezing, and reheating them in the microwave when you need an on the go snack! This recipe gives you step by step instructions on how to do this at home.
Making the dough
Char siu bao is a type of baozi (which are filled buns) that are steamed with a fluffy and soft white outer layer. Its dough is very similar dough to steamed bao buns (or lotus leaf buns). Baozi is not to be confused with mantou, which are non-filled steamed buns. This bao wrapper is the first step to creating these delicious buns!
Before you start anything, you want to sift the all purpose flour, cornstarch, and baking powder together to make sure you have no lumps when forming the dough. Place the mixture directly into a stand up mixer with the dough hook attachment and add the sugar and instant active yeast. Since I’m using instant yeast, I don’t have to wait to bloom the yeast. To test if your yeast is still good, follow this process from King Arthur Flour.
Turn the stand up mixer to low and gradually add the water and vegetable oil to the bowl as the dough hook mixes the ingredients. Continue to mix on low until all the ingredients are combined and the dough pulls away from the sides. Mix for about eight minutes total or until the dough is smooth. If your dough is too wet and is not pulling into a round shape in the mixer, add one tablespoon of all purpose flour at a time until you get the right consistency.
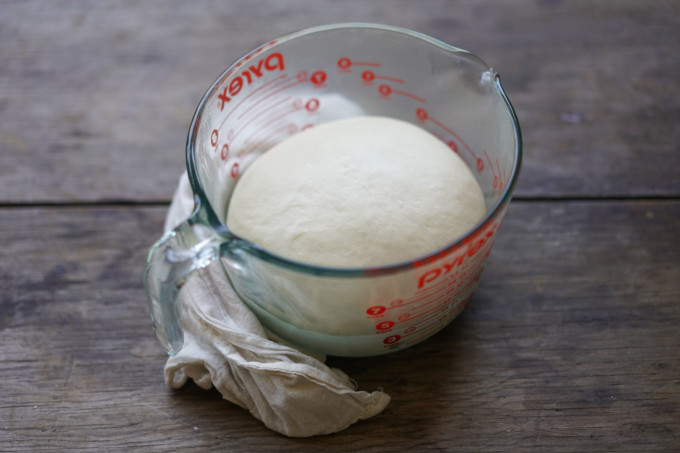
Once your dough is nice and smooth, remove it from the bowl and shape it into a ball. Lightly grease the inside of your mixing bowl with about one teaspoon of neutral oil so it doesn’t stick and place the dough back in and cover with a damp towel. Place the dough to proof near a warm (at least 75 °F) windowsill for at least two hours.
How to make the char siu filling
To make the char siu filling, first, you need to get your hands on char siu, which is Chinese roasted pork that you can find at your local Chinese restaurant or even grocery store. For this recipe, we made char siu from scratch using my recipe.

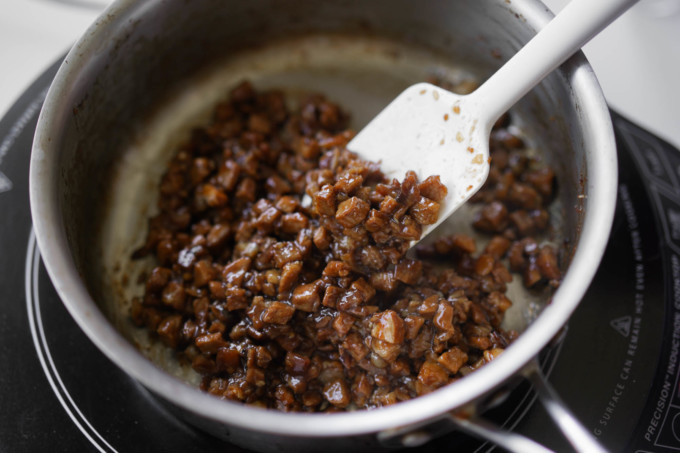
Making the filling is super easy! Chop your char siu into small pieces, about three millimeters cubes per piece. In a saucepan over medium-high heat, combine the oyster sauce, light soy sauce, dark soy sauce, sugar, five-spice, garlic, and sesame oil. Add the cornstarch and water mixture to the saucepan. When it reaches a boil, lower the heat to medium and continue to cook for about two minutes or until the sauce is the same consistency as honey.
Then, add the char siu pieces and cook for one minute. Note: this filling shouldn’t be too liquidy. Remove the filling from the heat and leave this to rest while you finish making the bao buns. You want to chill the sauce before adding them into the dough because you’ll end up with a sticky mess if it’s not cooled properly.
How to assemble and wrap the buns
Now that you have your sweet char siu filling, you can finish making your buns! After two hours of proofing, your dough should be at least double the size it was previously. Remove it from the bowl and place it onto a floured surface.
Knead your dough using the heel of your hand for about one minute until your dough is smooth, shape it into a circle, and then weigh your dough. I like to weigh my dough and divide by 24 so I can cut and shape each piece evenly. Each of my pieces are roughly 60-62 grams per piece.
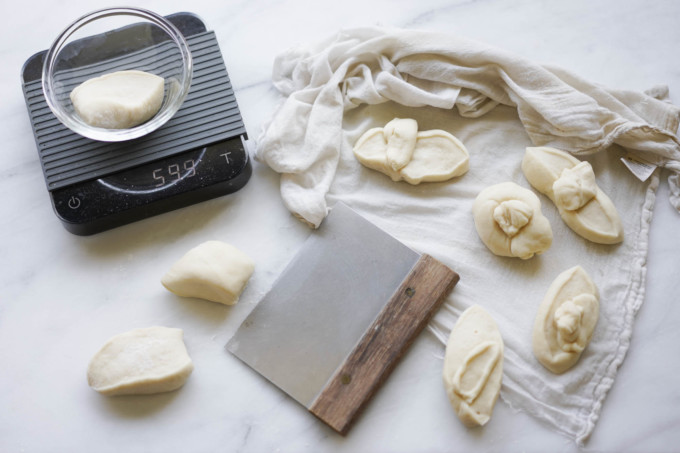
Use your hands to shape the dough into about a three inch thick log. Cut one piece of dough and weigh it to make sure it’s evenly proportioned. Using a rolling pin on a floured surface, take one piece of dough and roll it into about a three inch diameter circle.
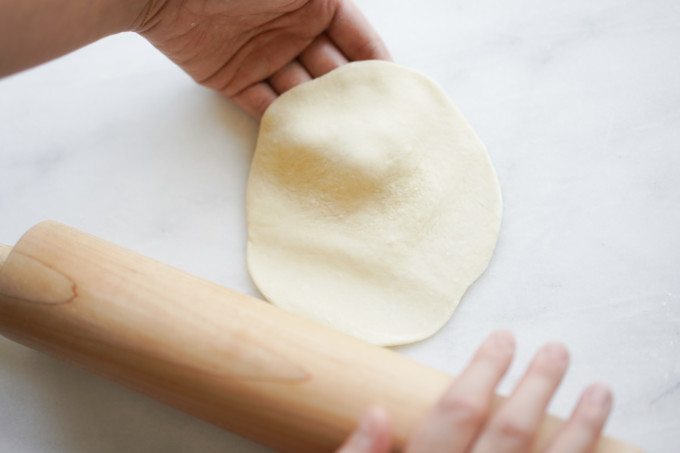
Then, roll out the edges of the circle so that the edges are thinner than the middle section. The thin edges help with pleating the bao, and so you have an even amount of dough above and below the filling. Repeat this with the other cut pieces and log of dough.
While there are different ways to fold your bao, I like to make a swirl on top because it’s more pleasing to the eye! It definitely takes a bit of practice, but once you get the hang of it, it’s easier to do. Place your wrapper in the palm of your non-dominant hand (mine is my left) and put about two tablespoons of char siu filling in the middle.
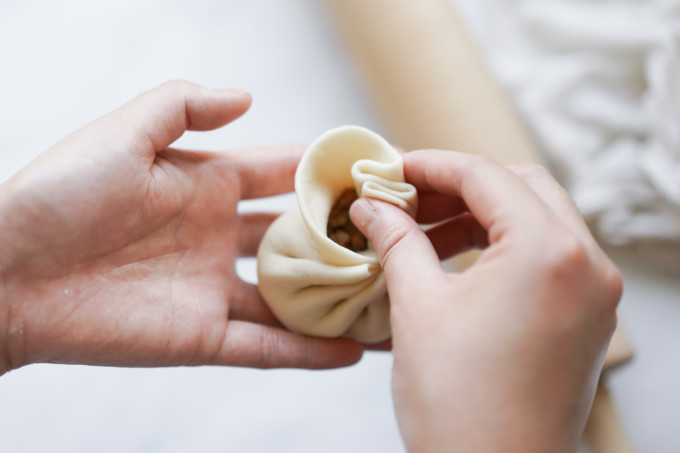
With your dominant hand, begin to fold the outside edges of the dough with your pointer finger and thumb. This should start to look like pleating around the filling. You can use the index finger and pointer finger of your non-dominant hand to guide more dough into the pleating.
Continue to pleat in a circle until you reach your first fold and then close your dough by pinching–you may have to reshape it a bit to maintain the swirl design. Repeat with the rest of the baos.
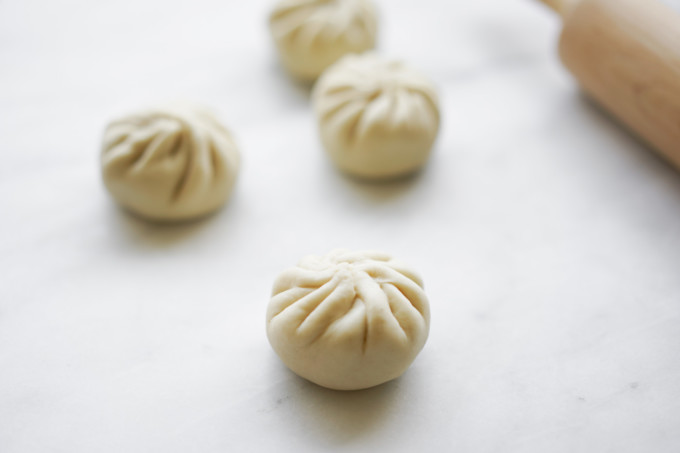
After you’ve finished wrapping all your baos, cover them with a damp towel and let them proof once more for about ten to 15 minutes. This gets your baos nice and plump before steaming!
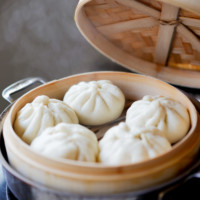
How to steam the buns
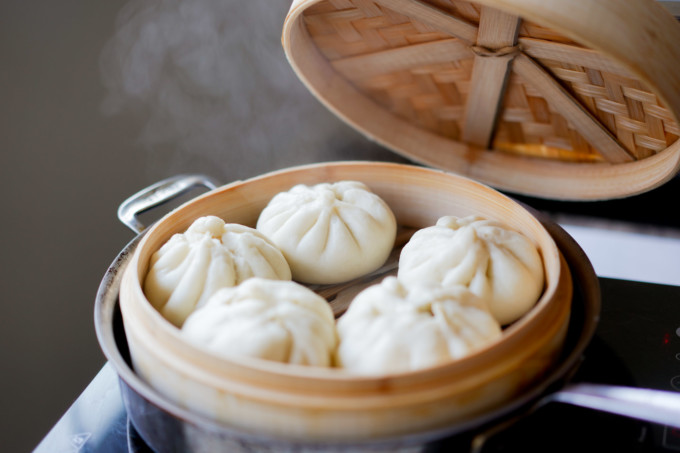
Line your bamboo steamer with parchment paper or even lettuce to make sure the bao does not stick to the steamer and get damaged. Fill your pot with about one and a half inches of water (you want to make sure that the water is not touching your steamer) and place your steamer on top to preheat the steamer before adding in your bao.
Follow these guidelines for steaming your bao:
- Preheat your steamer for proper cooking timing. I cook the bao for about ten minutes per session and this results in fluffy and soft bao.
- Make sure you leave space in between each bao because they will grow a bit inside the steamer. I leave about one inch in between each bao.
- Check the water levels of your pot as it steams, and be ready to add more when it drops because you don’t want to lose steam when cooking. It’s also helpful not to use a non-stick pot in case you do lose heat and ruin the coating on your pan.
- It might seem tempting, but try not to open the lid while cooking the bao. This could change the way the buns cook and you end up losing steam.
Servings and freezing
Serve these little babies as soon as possible to get an ample amount of fluffy goodness. If you do have extra on hand, I like to freeze them in an airtight container and save them for later.
I like eating bao best with other dim sum sides like chicken feet, cheung fun, pork and shrimp shumai, egg tarts, Chinese broccoli and oyster sauce, and xiao long bao.
How do you reheat steamed pork buns?
To reheat steamed pork buns, wet a paper towel where it’s almost soaking, but not dripping, and wrap the bun in the towel. Microwave in 30 second intervals until you get a warm and soft pork bun. The towel imitates a similar steaming method in the microwave and should add moisture to the cold and dry bun surface.
Tips
Some tips I’ve learned about making char siu bao to help you:
- Before you proof your dough, make sure to knead your dough until it’s smooth and pliable. The dough should be tacky, but not sticky or overly wet when you touch it. If you don’t knead your dough enough, your bao will come out lumpy and not as fluffy when you steam it.
- Although adding vegetable oil seems weird, I found that it helped get my dough to be super plump and fluffy. Definitely don’t skip out on this step.
- Weighing out and measuring each piece of your dough is helpful because you can make sure all your baos are even.
- After cutting pieces of the dough for wrapping, keep them covered under a towel to make sure they don’t dry out while I am wrapping bao.
- After you make your dough and proof it, don’t wait too long to make your bao. Your dough will continue to proof because it has active yeast in it. This could change the texture of your dough when you steam it.
- Proofing the bao for a second time AFTER wrapping them really helped plump up my bao. I definitely recommend this step. When I skipped proofing, the bao didn’t get as fluffy.
Char Siu Bao – Steamed BBQ Pork Buns
Ingredients
Dough
- 470 g (3 ¾ c and 3 tbsp) all purpose flour
- 100 g (12 ½ tbsp) cornstarch
- 10 g (2 tsp) baking powder
- 6 g (2 tsp) instant active yeast
- 100 g (½ c) sugar
- 9 fl oz (18 tbsp) water
- 2 fl oz (2 tbsp) vegetable oil plus a little extra for greasing the mixing bowl
Filling
- 1 lb char siu chopped into small pieces
- 1 fl oz (2 tbsp) oyster sauce
- ½ fl oz (1 tbsp) light soy sauce
- ½ fl oz (1 tbsp) dark soy sauce
- 16 g (4 tsp) sugar
- .25 g (⅛ tsp) five spice
- 2 clove garlic minced
- 2 tsp sesame oil
- .67 g (1 tsp) cornstarch
- 2 fl oz (4 tbsp) water
Instructions
Dough
- Sift cornstarch, baking powder, and flour together, then add to your stand mixer with the dough hook attachment. Add sugar and instant active yeast and turn the mixer onto stir.
- Turn the stand mixer on low and slowly add the water and vegetable oil. Continue to mix the mixture for about eight minutes until the dough is released from the sides and is smooth.
- Remove, take off from the bowl, shape the dough into a ball.
- Lightly grease the inside of the mixing bowl with one teaspoon of neutral oil and place the dough back into the bowl. Cover with a damp towel and leave it to proof for at least two hours near a warm windowsill.
Filling
- Chop your char siu into small pieces about three millimeters.
- In a saucepan, add the oyster sauce, light soy sauce, dark soy sauce, sugar, five spice, garlic, and sesame oil and mix thoroughly. Cook this on medium-high heat.
- Mix the cornstarch and water in a separate bowl and add into the saucepan. When the mixture reaches a boil, lower to medium heat and continue to cook for another two minutes or until the consistency is similar to molasses.
- Add the char siu pieces to the pan and cook for an additional minute.
- Remove the char siu filling from the heat and allow it to rest on the counter.
Assembly and steaming
- After two hours of proofing, your dough should have doubled in size. Move the dough onto a floured surface and lightly knead the dough with the heel of your hand for about one minute until it’s smooth and shape into a ball.
- Weigh the dough and divide that weight by 16, for our dough, we averaged about 60-62 grams per piece. Shape the dough into a log and use a knife to cut pieces of dough and then weigh them to make sure all the pieces are about the same weight.
- Take one piece and use a rolling pin to roll it out into a three inch diameter circle. If necessarily, sprinkle flour on the surface to prevent sticking. Then, use your rolling pin to thin out the edges of the circle while keeping the middle section the same thickness. Your dough should be the size of about 3 ½ to 4 inches now.
- Add two tablespoons of char siu filling in the middle of the circle.
- To fold, hold your wrapper filled with meat on your non-dominant hand. With your dominant hand, take your thumb and pointer finger and begin to fold the edges around the meat. This should look like pleating. I like to use my non-dominant hand’s pointer and index finger to guide more dough into the pleating. Continue to pleat in a circle until you reach the first pleat and close off the entire top with a pinch. The bao should have a swirl pattern on the top. Repeat with the rest of the baos.
- Before steaming, cover the wrapped bao with the same damp cloth from before and proof again for about ten to 15 minutes.
- Line your steamer with parchment paper or lettuce.
- Add about one and a half inches of water in your pot, but not too much that it’s touching your steamer. Preheat your steamer before adding the bao for about two minutes.
- Add your bao into the steamer and leave space between each bao.
- Steam the bao for about ten minutes and do not remove the lid during this time.
- After they’re finished, remove the bao from the steamer and serve immediately.


Hello Huy, I just came across your site and loving it!
Do you use warm water or room temp water is ok? Also, can I replace milk for the water.
Looking forward to trying out more of your recipes!
Hey Ann, room temp water is ok! I haven’t tried using milk instead of water but you probably can and it would be fine. I’d just slowly add it to see if the texture is ok, adding more if needed.
Just made it today and wow! The buns came out so fluffy and the taste was just right! Love love love this recipe. Thank you!!!